Get started by editing app/page.tsx
Following this video "Install Git, Clone a project (Windows)" https://www.youtube.com/watch?v=Jge57UHvYto&list=WL&index=3 for Git Installation on Windows10 worked for me.
Back to .NET Basics: How to properly use HttpClient
https://www.tpeczek.com/2019/10/alternative-approach-to-httpclient-in.html
Alternative approach to HttpClient in AZURE Functions 2.0 revisited – move to dependency injection
Hi there 👋, I"m Tomasz Pęczek
Software Developer & Architect • Blogger • Speaker • OSS Contributor • Microsoft MVP
Asp.Net Core Authorization Made Easy
https://github.com/danpdc/aspNetCoreBeginners
Likes: 254
This second lesson of the “ASP.Net Core for beginners” course is almost entirely hands on. We will satrt implementing our API, by first setting up our project structure according to a layered architecture. We will implement our first endpoints and we will then talk about dependency injection.
Create class library for DAL, Domain, Services, project for WebAPI.
https://www.codeproject.com/Articles/1162957/Dependency-Injection-to-The-Core
We can go further and build a composition root where we can do this kind of type initializations. The composition root is a simple class which will get called when the application is first initialized. In that class, we can resolve the specific types for our abstractions.
As you can see here, we have configured our HTTPRequest in such a way that if someone requests the TodoControllerwe will instantiate a new instance of TodoRepository and pass it to the controller's constructor. Likewise, we can change it toTodoCSVRepository or TodoInMemoryepository whenever we feel like. Now we have a single place to do all our dirty works of type initializations. In Web API projects we have to register this composition root in the Global.asax.cs file like this,
public class CompositionRoot : IHttpControllerActivator
{
public IHttpController Create(
HttpRequestMessage request,
HttpControllerDescriptor controllerDescriptor,
Type controllerType)
{
if (controllerType == typeof(TodoController))
return new TodoController(
new TodoRepository());
return null;
}
}
One thing to remember here is, a composition root implementation varies from framework to framework. Here we are working with Web API so this won’t work for MVC (may work) and WPF applications. You have to find a way to implement those but don’t worry because the internet has a lot of code snippets that can ease up your task of creating a composition root for a specific framework. Tell you what, I learned how to make a composition root like this for Web API projects after reading a blog from Mark Seeman. Here is the link for it,
http://blog.ploeh.dk/2012/09/28/DependencyInjectionandLifetimeManagementwithASP.NETWebAPI/
That’s good since we have to deal with resolving tiny dependencies for this small project of ours. What if we have a large project where hundreds of dependencies are scattered around? In that cases, composition root won’t be a good idea. That is why in enterprise level, we use a well-known IoC (Inversion of Control) container to make our job easy. IoC containers can resolve dependencies recursively and they are also pretty much easy to configure. They allows us to work with dependency injection lifecycle easily. There are many IoC containers available and most of them do the same things somewhat differently. Let’s use one of them in our current project. Let’s pick Autofac which has a great documentation online. Here is the link where you can know all about the Autofac integration related stuff with Web API projects,
http://autofac.readthedocs.io/en/latest/integration/webapi.html
https://stackoverflow.com/users/2281790/harald-coppoolse
About
Taught by Professor Dijkstra, so I'm conditioned like a Maslov dog to make software how it "ought" to be done, not for fast hacks, which sometimes is a drawback, except if you're working in projects with a lot of people that need to keep working for years and years continuously changing it.
- "Finally a language that is well designed".
- Hurray! Never have to use a macro again
https://github.com/MikaelGRA/InfluxDB.Client
About
InfluxDB Client for .NET. Timeseries Database - InfluxDB which is very popular and used in many .NET applications.
InfluxDB Client for .NET
This library makes it easy to be a client for InfluxDB on .NET!
This library makes it easy to be a client for InfluxDB on .NET!The basic idea behind the library is that it should be able to turn queries directly into objects of your own classes. Much like micro-ORMS such as dapper.
The goal is that we want to be able to support LINQ syntax in the future.
Installation
Install it through nuget with the following command.
Reading/Writing
The library exposes all HTTP operations on InfluxDB (1.0+) and can be used for reading/writing data to/from in two primary ways:
Using your Own POCO classes
Start by defining a class that represents a row in InfluxDB that you want to store.
public class ComputerInfo
{
[InfluxTimestamp]
public DateTime Timestamp { get; set; }
[InfluxTag( "host" )]
public string Host { get; set; }
[InfluxTag( "region" )]
public string Region { get; set; }
[InfluxField( "cpu" )]
public double CPU { get; set; }
[InfluxField( "ram" )]
public long RAM { get; set; }
}
On your POCO class you must specify these things:
- 1. 1 property with the type DateTime, DateTime?, DateTimeOffset or DateTimeOffset? as the timestamp used in InfluxDB by adding the [InfluxTimestamp] attribute.
- 2. 0-* properties with the type string, long, ulong, int, uint, short, ushort, byte, sbyte, double, float, bool, DateTime, DateTimeOffset, decimal or a user-defined enum (nullables too) with the [InfluxTag] attribute that InfluxDB will use as indexed tags. Note that all tags in InfluxDB is still stored a string. The library will simply making the conversion to the specified type automatically.
- 3. 1-* properties with the type string, long, ulong, int, uint, short, ushort, byte, sbyte, double, float, bool, DateTime, DateTimeOffset, decimal or a user-defined enum (nullables too) with the [InfluxField] attribute that InfluxDB will use as fields.
Once you've defined your class, you're ready to use the InfluxClient, which is the main entry point to the API:
Here's how to write to the database:
private ComputerInfo[] CreateTypedRowsStartingAt( DateTime start, int rows )
{
var rng = new Random();
var regions = new[] { "west-eu", "north-eu", "west-us", "east-us", "asia" };
var hosts = new[] { "some-host", "some-other-host" };
var timestamp = start;
var infos = new ComputerInfo[ rows ];
for ( int i = 0 ; i < rows ; i++ )
{
long ram = rng.Next( int.MaxValue );
double cpu = rng.NextDouble();
string region = regions[ rng.Next( regions.Length ) ];
string host = hosts[ rng.Next( hosts.Length ) ];
var info = new ComputerInfo { Timestamp = timestamp, CPU = cpu, RAM = ram, Host = host, Region = region };
infos[ i ] = info;
timestamp = timestamp.AddSeconds( 1 );
}
return infos;
}
public async Task Should_Write_Typed_Rows_To_Database()
{
var client = new InfluxClient( new Uri( "http://localhost:8086" ) );
var infos = CreateTypedRowsStartingAt( new DateTime( 2010, 1, 1, 1, 1, 1, DateTimeKind.Utc ), 500 );
await client.WriteAsync( "mydb", "myMeasurementName", infos );
}
Author of Blog: Mikael Guldborg Rask Andersen
Stars: 103
Pull data from multiple tables in one SQL query using LINQ and Entity Framework(Core)
Answerd by: https://stackoverflow.com/users/2281790/harald-coppoolse
I wanted to grab the 10 latest transactions and 10 latest customers in one LINQ query
It is a bit unclear what you want. I doubt that you want one sequence with a mix of Customers and Transactions. I guess that you want the 10 newest Customers, each with their last 10 Transactions?
I wonder why you would deviate from the entity framework code first conventions. If your class Customer represents a row in your database, then surely it doesn't have a HashSet <Transaction>?
A one-to-many of a Customer with his Transactions should be modeled as follows:
class Customer
{
public int Id {get; set;}
... // other properties
// every Customer has zero or more Transactions (one-to-many)
public virtual ICollection<Transaction> Transactions {get; set;}
}
class Transaction
{
public int Id {get; set;}
... // other properties
// every Transaction belongs to exactly one Customer, using foreign key
public int CustomerId {get; set;}
public virtual Customer Customer {get; set;}
}
public MyDbContext : DbContext
{
public DbSet<Customer> Customers {get; set;}
public DbSet<Transaction> Transactions {get; set;}
}
This is all that entity framework needs to know to detect the tables you want to create, to detect your one-to-many relationship, and to detect the primary keys and foreign keys. Only if you want different names of tables or columns, you'll need attributes and/or fluent API The major differences between my classes and yours, is that the one-to-many relation is represented by virtual properties. The HashSet is an ICollection. After all, your Transactions table is a collection of rows, not a HashSet
In entity framework the columns of your tables are represented by non-virtual properties; the virtual properties represent the relations between the tables (one-to-many, many-to-many, ...)
Quite a lot of people tend to (group-)join tables, when they are using entity framework. However, life is much easier if you use the virtual properties
Back to your question
I want (some properties of) the 10 newest Customers, each with (several properties of) their 10 latest Transactions
var query = dbContext.Customers // from the collection of Customer
.OrderByDescending(customer => customer.Created) // order this by descending Creation date
.Select(customer => new // from every Customer select the
{ // following properties
// select only the properties you actually plan to use
Id = Customer.Id,
Created = Customer.Created,
Name = Customer.Name,
...
LatestTransactions = customer.Transactions // Order the customer's collection
.OrderBy(transaction => transaction.Created) // of Transactions
.Select(transaction => new // and select the properties
{
// again: select only the properties you plan to use
Id = transaction.Id,
Created = transaction.Created,
...
// not needed you know it equals Customer.Id
// CustomerId = transaction.CustomerId,
})
.Take(10) // take only the first 10 Transactions
.ToList(),
})
.Take(10); // take only the first 10 Customers
Entity framework knows the one-to-many relationship and recognizes that a group-join is needed for this.
One of the slower parts of your query is the transfer of the selected data from the DBMS to your local process. Hence it is wise to limit the selected data to the data you actually plan to use. If Customer with Id 4 has 1000 Transactions, it would be a waste to transfer the foreign key for every Transaction, because you know it has value 4.
https://www.entityframeworktutorial.net/code-first/code-first-conventions.aspx
Extra:These EF 6.x Code-First conventions are defined in the System.Data.Entity.ModelConfiguration.Conventions namespace.
The following table lists default code first conventions:
Default Convention For | Description | |
---|---|---|
Schema | EF creates all the DB objects into the dbo schema. | |
Table Name | By default, EF will create a DB table with the entity class name suffixed by 's' e.g. Student domain class (entity) would map to the Students table. | |
Primary key Name |
| |
Foreign key property Name | By default EF will look for the foreign key property with the same name as the principal entity primary key name. If the foreign key property does not exist, then EF will create an FK column in the Db table with <Dependent Navigation Property Name> + "_" + <Principal Entity Primary Key Property Name> e.g. EF will create Grade_GradeId foreign key column in the Students table if the Student entity does not contain foreign key property for Grade. |
Extra_End
https://github.com/dotnet/EntityFramework.Docs
Stars: 1.5k
title: One-to-many relationships - EF Core description: How to configure one-to-many relationships between entity types when using Entity Framework Core author: ajcvickers ms.date: 03/30/2023 uid: core/modeling/relationships/one-to-many
Extra_End
https://codeblog.jonskeet.uk/2019/03/27/storing-utc-is-not-a-silver-bullet/27/3/2019
Extra:STORING UTC IS NOT A SILVER BULLET
Note: this is a pretty long post. If you are not interested in the details, the conclusion at the bottom is intended to be read in a standalone fashion. There is also a related blog post by Lau Taarnskov https://www.creativedeletion.com/2015/03/19/persisting_future_datetimes.html - if you find this one difficult to read for whatever reason, maybe give that a try.
When I read Stack Overflow questions involving time zones, there 's almost always someone giving the advice to only ever store UTC. Convert to UTC as soon as you can, and convert back to a target time zone as late as you can, for display purposes, and you 'll never have a time zone issue again, they say.
This blog post is intended to provide a counterpoint to that advice. I'm certainly not saying storing UTC is always the wrong thing to do, but it s not always the right thing to do either. Note on simplifications: this blog post does not go into supporting non-Gregorian calendar systems, or leap seconds. Hopefully developers writing applications which need to support either of those are already aware of their requirements.
Background: EU time zone rule changes
The timing of this blog post is due to recent European Parliament proceedings that look like they will probably end the clocks changing twice a year into “summer time” or “winter time” within EU member states. The precise details are yet to be finalized and are unimportant to the bigger point, but for the purpose of this blog post I'll assume that each member state has to decide whether they will “spring forward” one last time on March 28th 2021, then staying in permanent “summer time”, or “fall back” one last time on October 31st 2021, then staying in permanent “winter time”. So from November 1st 2021 onwards, the UTC offset of each country will be fixed – but there may be countries which currently always have the same offset as each other, and will have different offsets from some point in 2021. (For example, France could use winter time and Germany could use summer time.)
The larger point is that time zone rules change, and that applications should expect that they will change. This isn't a corner case, it's the normal way things work. There are usually multiple sets of rule changes (as released by IANA) each year. At least in the European changes, we're likely to have a long notice period. That often isn't the case – sometimes we don't find out about rule changes until a few days before they happen.
Extra_End
wesdoyle followed 04/01/2024 Shay Rojansky roji, Principal software engineer working on .NET data access and perf, member of the Entity Framework team at Microsoft. Lead dev of Npgsql, the PostgreSQL provider.
Extra:When “UTC everywhere” isn't enough
I've been dealing a lot with timestamps, timezones and database recently - especially on PostgreSQL (see this blog post), but also in general. Recently, on the Entity Framework Core community standup, we also hosted Jon Skeet and chatted about NodaTime, timestamps, time zones, UTC and how they all relate to databases - I highly recommend watching that!
Now, a lot has been said about “UTC everywhere”; according to this pattern, all date/time representations in your system should always be in UTC, and if you get a local timestamp externally (e.g. from a user), you convert it to UTC as early as possible. The idea is to quickly clear away all the icky timezone-related problems, and to have a UTC-only nirvana from that point on. While this works well for many cases - e.g. when you just want to record when something happened in the global timeline - it is not a silver bullet, and you should think carefully about it. Jon Skeet already explained this better than I could, so go read his blog post on this. As a very short tl;dr, time zone conversion rules may change after the moment you perform the conversion, so the user-provided local timestamp (and time zone) may start converting to a different UTC timestamp at some point! As a result, for events which take place on a specific time in a specific time zone, it's better to store the local timestamp and the time zone (not offset!).
So let's continue Jon's blog post, and see how to actually perform that on two real databases - PostgreSQL and SQL Server. Following Jon's preferred option, we want to store the following in the database:
- 1. The user-provided local timestamp.
- 2. The user-provided time zone ID. This is not an offset, but rather a daylight savings-aware time zone, represented as a string.
- 3. A UTC timestamp that's computed (or generated) from the above two values. This can be used to order the rows by their occurrence on the global timeline, and can even be indexed.
In Jon's NodaTime library, the ZonedDateTime type precisely represents the first two values above. Unfortunately, databases typically don't have such a type; SQL Server does have datetimeoffset, but an offset is not a time zone (it isn't daylight savings-aware). So we must use separate columns to represent the data above.
PostgreSQL
PostgreSQL conveniently has a type called timestamp without time zone for local timestamps in an unspecified time zone, and a badly-named type called timestamp with time zone, for UTC timestamps (no time zone is actually persisted); those are perfect for our two timestamps. We also want the UTC timestamp to be generated from the two other values, so we’ll set up a PostgreSQL generated column (called computed column by EF Core) to do that. Here's the minimal EF Core model and context, using the NodaTime plugin:
Extra_End
Upgrade .NET version of XXX Server Components
Extra:To support TLS 1.2 capabilities, the recommendation to upgrade the app to .NET Framework 4.7 or a later version.
We only upgrade XXX Server components with .NET 4.7.2 and XXX Agent still on .NET 4.5.2
Technical Description
XXX Management Service, XXX Management Tool and Configuration Loader Component will be targeted to .NET 4.7.2 from 4.5.2
All associated Query/3rd party open source will be updated with the right version and the targeting framework.
For .NET Framework 3.5 - 4.5.2 and not WCF
We recommend you upgrade your app to .NET Framework 4.7 or a later version. If you cannot upgrade, take the following steps:
- 1. Set the values of SchUseStrongCrypto and SystemDefaultTlsVersions registry entries to 1. See Configuring security via the Windows Registry..NET Framework 3.5 supports the SchUseStrongCrypto flag only when an explicit TLS value is passed.
- 2. If you're running on .NET Framework 3.5, you need to install a hot patch so that TLS 1.2 can be specified by your program:
Extra_End
Enabling TLS 1.2 on your .NET application by Dominic Burford12/12/2019
I recently came across an issue with several of our ASP.NET WebAPI services which were consuming a third-party set of APIs. These third-party APIs were configured to disable any requests from clients that were using TLS 1.0/1.1. Unfortunately, this included our own APIs. All requests to the third-party API were returning empty responses. After some discussion with one of the developers of the third-party APIs, he suggested the issue may be related to TLS 1.2 not being supported as he had seen the issue before.
Extra:Claps: 25
The Transport Layer Security (TLS) protocol is an industry standard designed to help protect the privacy of information communicated over the Internet. TLS 1.2 is a standard that provides security improvements over previous versions. TLS 1.2 will eventually be replaced by the newest released standard TLS 1.3 which is faster and has improved security.
- Transport Layer Security (TLS) best practices with the .NET Framework | Microsoft Docs
I was able to run the third-party APIs from our local test environment, but not when I ran them from our staging / production environments which were hosted on Azure. I had to make several changes, including code changes to the ASP.NET WebAPI services and changes to our Azure hosting environments.
As many current servers are moving towards TLS 1.2/1.3 and removing support for TLS 1.0 /1.1, connectivity issues between newer servers and older (legacy) .NET applications are becoming more common. Installing a newer version of the .NET Framework onto your development environment is not the answer. The solution is down to the version of the .NET Framework used for compiling your project. This is what actually matters when it comes to selecting the supported TLS version during the TLS handshake.
In this article I will describe the changes I have made to our Azure hosting (where our ASP.NET WebAPIs are hosted) and the code changes which enabled TLS 1.2 support.
Upgrading our Azure hosting to support TLS 1.2
More accurately the changes I have made to our Azure hosting have removed support for earlier versions of TLS i.e. TLS 1.0/1.1. Although this change was not strictly necessary to fix the problem I was experiencing, it was appropriate in terms of tightening up the security of our ASP.NET WebAPIs and to ensure that our own APIs can only be accessed by clients that support TLS 1.2. This is quite simply achieved by opening the Azure portal and navigating to the App Service hosting. From there the TLS/SSL Settings blade can be selected.
I have set this to TLS 1.2 for both our staging and production environments. This sets the minimum TLS version. Therefore our hosting environments will no longer accept requests from earlier versions of TLS.
Code changes to support TLS 1.2
Depending on what version of .NET Framework your project uses will dictate the possible solutions available to you. If your project compiles against .NET Framework >= 4.7 then you are already good to go. Applications developed in .NET Framework 4.7 or greater automatically default to whatever the operating system they run on considers safe (which currently is TLS 1.2 and will later include TLS 1.3).
If your application has been developed in a version of the .NET Framework prior to 4.7 then you have two options.
Recompile your application using .NET Framework 4.7 or greater - If recompiling your application is not something you can do then you can update your .config file by adding the following.
<configuration>
<runtime>
<AppContextSwitchOverrides value="Switch.System.Net.DontEnableSystemDefaultTlsVersions=false"/>
</runtime>
</configuration>
Also make sure you have the following set in your .config file.
<system.web>
<compilation targetFramework="x.y.z" />
<httpRuntime targetFramework="x.y.z" /> <-- this is the important one!
</system.web>
Extra_End
Setting up ASP.NET Core dev certs for both WSL and Windows04/05/2021
Extra:For those of you who haven't read the old post, here is some background information. If you ever want to do your ASP.NET Core development using both WSL (using the Remote - WSL extension) and Windows, you will soon realize that there are some inherent issues with the local development certs… Mainly that ASP.NET Core sets up one development certificate in Windows, and one in Linux. And neither environment trusts the other. Not to mention that Linux doesn't even trust its own cert, making server to server communication hard in Linux.
Unfortunately, the tools provided by dotnet doesn't quite seem to do the trick when trying to get mutual trust to work. I'm not sure why, but at least on my machine, any cert that is generated by dotnet has problems when it comes to being able to trust it in Linux. So because of this, there are a few hoops we need to jump through to get this to work…
Note: My guess is that Linux requires a CA to issue the cert to be able to trust it. However, the cert generated by .NET is not a properly issued cert with a CA as this has some inherent dangers… Dangers I will ignore on my development box, and try to mitigate by keeping my cert VERY safe
In the previous post, there were quite a few steps involved in getting it to work. However, it can be simplified a bit at least…and made to work…
Dev certs in Linux
When you install the .NET SDK, an ASP.NET developer certificate is generated and configured for use by ASP.NET. However, it doesn't seem like that cert is being properly trusted by Linux, causing server to server communication to fail. Because of this, we need to generate our own self-signed cert. Luckily, this isn't too hard with the help of Google…
The first step is to create an OpenSSL configuration file that looks like this
[req]
prompt = no
default_bits = 2048
distinguished_name = subject
req_extensions = req_ext
x509_extensions = x509_ext
[subject]
commonName = localhost
[req_ext]
basicConstraints = critical, CA:true
subjectAltName = @alt_names
[x509_ext]
basicConstraints = critical, CA:true
keyUsage = critical, keyCertSign, cRLSign, digitalSignature,keyEncipherment
extendedKeyUsage = critical, serverAuth
subjectAltName = critical, @alt_names
1.3.6.1.4.1.311.84.1.1 = ASN1:UTF8String:ASP.NET Core HTTPS development certificate
[alt_names]
DNS.1 = localhost
DNS.2 = 127.0.0.1
Note: This config creates a certificate that is both a CA and an SSL cert. The reason for this is that Linux needs a CA cert to be able to trust it.
Once we have our OpenSSL configuration, we can go ahead and generate our certificate by running
> openssl req -x509 -nodes -days 365 -newkey rsa:2048 \
-keyout localhost.key \
-out localhost.crt \
-config localhost.conf
This generates a key pair based on the configuration file we just created.
Just for the sake of it, we can verify that it currently isn't trusted, by running
> openssl verify localhost.crt
CN = localhost
error 18 at 0 depth lookup: self signed certificate
error localhost1.crt: verification failed
To trust the cert, we need to copy it to /usr/local/share/ca-certificates, and add it to our trusted CA:s. Like this
> sudo cp localhost.crt /usr/local/share/ca-certificates
> sudo update-ca-certificates
After that, we should be able to verify that the cert is trusted by running openssl verify again
> openssl verify localhost.crt
localhost.crt: OK
The last step is to make sure that ASP.NET Core uses this certificate when SSL is turned on. This is easily done by running the dotnet dev-certs command. However, this command expects a PKCS12 certificate. So before we can do that, we need to convert our key pair into a PKCS12 cert using OpenSSL
openssl pkcs12 -export -out localhost.pfx -inkey localhost.key -in localhost.crt
Once we have out PFX-file, we can finally tell ASP.NET to use it by running
Remember: Make sure it is a secure password! If anyone should get their hands on this cert, it could be used to launch a malicious attack against your machine. So keeping it safe is VERY important! And also make sure that the key pair is stored in a safe place.
Ok, that's it from the Linux side…
Dev certs in Windows
When you install the .NET Core SDK on Windows, it creates a development HTTPS certificate for you automatically just like it does in Linux. All you have to do is run dotnet dev-certs https --trust to trust it and you are good to go! However, in this case we want to replace that cert with the cert we just created…
The first step in doing this, is to get hold of the PFX file we just generated. On my machine, I copy it to a user specific folder by running the following command in WSL
Author of Blog: Chris Klug
If you have any comments or questions, feel free to reach out at @ZeroKoll!
Extra_End
Author links open overlay panelLibo Chen a, Yihang Xia b, Zhenbang Ma c, Ruijie Zhao a, Yanhao Wang c, Yue Liu d, Wenqi Sun a, Zhi Xue a
Citations: 6
Extra_End
wilsonmar (Wilson Mar) (github.com) followed @spotakash24/10/2021
Azure Cross Tenant Access (Authentication, Authorization, Private Communication).
Extra:There are two idependent Azure tenants, across which we shall try to build authentication, authorization. Subsequently, we shall have secure private connectivity between both tenant so that communication does not traverse through internet and remain private.
- 1. Source Tenant: Tenant which is Central Identity Store. This identity store (Azure AD) will create and store Service Principals. In Source Tenant, We are processing data residing in Destination tenant.
- 2. Destination Tenant: Tenant where data is coming in and residing. Data from this tenant can not move out. It is data store.
- Requirements:
- 1. Systems, running in Source Tenant, should be able to reach Destination Tenant.
- 2. While doing so, proper secured authentication and authorization should be performed.
- 3. For authentication in Destination Tenant, no guest account access should be used.
- 4. Request should not traverse through Internet and traffic should remain total private.
- 5. Source and Destination tenant can not have any sort of Virtual Network Peering or Mesh Private Connectivity between them.
- 6. All requests at Source Tenant and Destination on Identity, Connectivity and Data Layer should be logged in loganalytics for compliance purpose.
- 7. No Private IP hardcoding should be used in any system. Proper FQDNs based DNS resolution happen while accessing/processing data.
- Solution:
- 1. Use Multi-tenant Azure AD Service Principal (Enterprise Application) to authenticate across Source and Destination Tenants.
- 2. Use Cross Tenant Private Endpoint to access resources over Private Network (Microsoft Backbone Network), without having any Virtual Network Peering or Mesh Private Connectivity
- 3. Centralized Azure Private DNS Zone for DNS Resoluation for Cross Tenant DNS resolution to Private Endpoint
- Pre-Requirements:
- 1. Source and Destination Tenant Administrative Rights to create Application under Application Registration
- 2. Have a virtual network with subnet (ideally) to be used for Private Endpoint, in Source Tenant.
- 3. Source and Destination Tenant Administratibe Rights to create cross tenant Private Endpoint Request (at Source Tenant) And Approval (at Destination Tenant)
- 4. Sufficient IAM Role to assign IAM to Service Principal (created above) on Azure resource example: Storage/DB/Redis/AKS etc. (at Destination Tenant).
- 4a. Atleast, Azure Resource Manager Reader role
- 4b. For Storage Access (example), data access role, such as Storage Blob Data Contributor
- 4c. Define your IAM strategy accordingly. Treat both Control Plane and Data Plane permission Good Azure Document to Refer.
- 5. If using existing Centralized Azure Private DNZ Zone (in our case we are using), atleast Private DNZ Zone Contributor to allow you to create DNS Record for Existing Private Endpoint
Technical Steps
- 1. Have Service Principal in Source Tenant Identity Store (AAD)
az ad sp create-for-rbac -n "cross-tenant-app"
- 2. Retrieving and verifying details
- 2.1. Note down Application ID and Secret generated in Source Tenant
- 2.2. Verify Application ID Listed in Application Registration (as Application (client) ID) and 'Enteprise Application' (as Application ID).
- 3. Go to Application Registration/Authentication and Enable for ApplicationID 'Accounts in any organizational directory (Any Azure AD directory - Multitenant)
- 4. By doing these steps, a multi-tenant Service Principal has been created in Source Tenant.
Stars: 10
Extra_End
Sidecar Proxy Pattern - The Basis Of Service Mesh by Ivan Velichko
Sidecar Proxy Pattern - The Basis Of Service Mesh07/08/2021
Sidecar Proxy Pattern - The Basis Of Service Mesh by @iximiuz
Extra:Heart: 347
Author of Blog: Ivan Velichko
Learning Containers, Kubernetes, and Backend Development
Want to learn Docker or Kubernetes? Struggle to understand what this Cloud Native buzz is about? On a mission to master Server-Side Craft? Then you're at the right place!
- ✔ In-depth technical materials.
- ✔ Focus on true fundamentals.
- ✔ Clear and visual explanations.
- ✔ Interactive playgrounds.New
As someone going through a similar learning journey, I keep my articles experiential and put a great deal of effort into explanatory drawings and interactive playgrounds.
Most popular posts
- ⭐ How Kubernetes Reinvented Virtual Machines
- ⭐ Learning Containers From The Bottom Up
- ⭐ Containers vs. Pods - Taking a Deeper Look
- ⭐ Container Networking Is Simple!
- ⭐ Computer Networking Basics For Developers
- ⭐ A Visual Guide to SSH Tunnels
- ⭐ From Docker Container to Bootable Linux Disk Image
- ⭐ The Need For Slimmer Containers
- ⭐ DevOps, SRE, and Platform Engineering
Extra_End
Writing .NET Application Services for Kubernetes By Mike Hadlow24/06/2022
Extra:In a traditional .NET distributed application, application services (not to be confused with the Kubernetes 'service' object) would either be written as IIS hosted web applications or Windows Services. When building .NET (micro)services to be deployed in a Kubernetes cluster pretty much every facet of the service needs to be reconsidered, not only the hosting environment but the way configuration is accessed, how logging and monitoring work, and the options for state management and memory considerations. In this post I'll bring my experience of migrating .NET applications to Kubernetes to enumerate some of the main ways that you'll need to change the way you write them.
First some caveats. I don't intend this post to be an introduction to Kubernetes, or a justification of why you should use Kubernetes. Nor is it a tutorial on how to write distributed applications or .NET application services. It's intended audience is my past self about a year and a half ago. I would have very much appreciated a short guide on the changes I would have to make to redesign my .NET application services to take full advantage of Kubernetes.
Application Service Design
Some general application design guidelines:
- 1. Build stateless horizontally scalable services. See the 12 factor apps guidelines.
- 2. Use Linux containers. .NET is now cross platform and runs well on Linux. Avoid the bloat and inevitable friction of Windows Containers.
- 3. Consider the container immutable. Do not change the local file system. If you need a file system, use a volume mount.
- 4. One container per pod. Although the sidecar pattern is a popular one, it's perfectly reasonable to have a complete distributed application without a single sidecar in sight. Like all popular patterns, only use it if you have a real need.
- 5. Every application is a console application. Processes are managed by Kubernetes. HTTP services should be standalone console based web apps using the Kestrel webserver.
One of the main advantages you'll find writing application services for Kubernetes is that the platform now provides many things that you would previously have had to include in your application. As I'll describe below things such as configuration, logging, metrics, and security all become simpler to implement.
Building your container images
Kubernetes is primarily a container orchestration framework. Your applications/services need to be built and deployed as (usually Docker) containers. Microsoft have published a very good guide to building and running containerized .NET applications, NET Microservices Architecture for Containerized .NET Applications that I'recommend reading, although it doesn't cover Kubernetes the advice on creating container images and microservice architecture is very good.
Although it's possible to compile your application in a traditional build server and then create the runtime container image from the compiled binaries, it's easier to combine the build and runtime in a single multi-stage docker file, that way you control the environment for both build and deployment. Here is a very simple example:
FROM mcr.microsoft.com/dotnet/aspnet:6.0-bullseye-slim AS runtime
WORKDIR /app
EXPOSE 80
FROM mcr.microsoft.com/dotnet/sdk:6.0-bullseye-slim AS sdk
ARG build_number=1.0.0
WORKDIR /app
COPY src/ .
# restore nuget packages
RUN dotnet restore
# build
RUN dotnet build --no-restore "-p:Version={build_number}"
# test
RUN dotnet test --no-build GreetingService.Tests/GreetingService.Tests.csproj
# publish
RUN dotnet publish --no-build -o output
# create runtime image
FROM runtime AS final
WORKDIR /app
COPY --from=sdk /app/output/ ./
ENTRYPOINT ["./GreetingsService"]
As you can see there are multiple FROM clauses. Each one discards the previous image so the final image is small.
Note, it's quite common to see just the .csproj file copied first for the restore phase, then the rest of the src contents copied for the build. This will give you smaller, more efficient, layer cacheing. Although if you are using an ephemeral build server such as GitHub Actions, there's probably little to be gained. Personally I like to keep things simple.
Build the image with docker build:
> docker build -t greetings-service:0.0.1 --build-args build_number=1.0.0 .
Once your container images are built, you should publish them to your internal image repository. GitHub provides a container registry as does Azure and all other cloud providers.
Deploying to Kubernetes
In the simplest case for an aspnet service you can deploy your application/service to Kubernetes by simply running a deployment specifying your image and the number of replicas you want:
apiVersion: apps/v1
kind: Deployment
metadata:
name: greetings-service-deployment
labels:
app: greetings-service
spec:
replicas: 2
selector:
matchLabels:
app: greetings-service
template:
metadata:
labels:
app: greetings-service
spec:
containers:
- name: greetings-service
image: greetings-service:0.0.1
You will also need a Kubernetes “service” to direct traffic to your pods, something like:
apiVersion: v1
kind: Service
metadata:
name: greetings-service-service
spec:
selector:
app: greetings-service
ports:
- name: greetings-service-service-port
protocol: TCP
port: 3456
targetPort: 5432
nodePort: 30001
type: LoadBalancer
Use kubectl apply to run the deployment:
> kubectl apply -f greetings-service-deployment.yaml
Consider using Helm to template your deployments for any but the very simplest cases. I've also had Kustomize recommended to me, which looks a little simpler than Helm, but I've not used it myself.
Build and Deployment
Your build and deploy pipeline will look something like this:
- 1. docker build . Build your service container image.
- 2. docker push ... Push your image to your image repository.
- 3. kubectl apply ... Execute the YAML file defining your deployment against your Kubernetes cluster.
If you are using GitHub for source control GitHub actions are a good choice for running these steps on a successful commit or pull request merge.
Author of Blog: Mike Hadlow
If you have any comments or questions, feel free to reach out at @mikehadlow
Software guy, blogger, author of EasyNetQ, AsmSpy and Guitar Dashboard. Technology, science, history and music geek. Lover of 70's prog rock, Tintin and Lego.
Extra_End
Coda Hale codahale (github.com) followed @samuel-lucas6
Guidance on implementing cryptography as a developer by Samuel Lucas12/01/2023
Extra:Kryptor: A simple, modern, and secure encryption and signing tool.
Geralt: A modern cryptographic library for .NET based on libsodium and inspired by Monocypher.
Cahir: A deterministic password manager.
Milva: A simple, cross-platform command line tool for hashing files and text.
Vanity: A simple WireGuard vanity public key generator.
The AEGIS Family of Authenticated Encryption Algorithms: The AEGIS-128L, AEGIS-256, AEGIS-128X, and AEGIS-256X Internet-Draft.
Balloon Hashing: An Internet-Draft for the Balloon password hashing function.
Encrypt-then-MAC for Committing AEAD (cAEAD): An Internet-Draft and committing ChaCha20-BLAKE2b AEAD implementation.
Cryptography Guidelines: Guidance on implementing cryptography as a developer.
This document outlines recommendations for cryptographic algorithm choices and parameters as well as important implementation details based on what I have learnt from reading about the subject and the consensus I have observed online. Note that some knowledge of cryptography is required to understand the terminology used in these guidelines.
My goal with these guidelines is to provide a resource that I wish I had access to when I first started writing programs related to cryptography. If this information helps prevent even just one vulnerability, then I consider it time well spent.
Note
This document is slowly being rewritten and split into individual pages. Please view the sections folder for the latest information.
Acknowledgements
These guidelines were inspired by this Cryptographic Best Practices gist, Latacora's Cryptographic Right Answers, and Crypto Gotchas, which is licensed under the Creative Commons Attribution 4.0 International License. The difference is that I mention newer algorithms and have tried to justify my algorithm recommendations whilst also offering important notes about using them correctly.
Disclaimer
I am a psychology undergraduate with an interest in applied cryptography, not an experienced cryptographer. I primarily have experience with the libsodium library since that's what I've used for my projects, but I've also reported some security vulnerabilities related to cryptography.
Most experienced cryptographers don't have the time to write things like this, and the following information is freely available online or in books, so whilst more experience would be beneficial, I'm trying my best to provide accurate information that can be fact checked. If I've made a mistake, please contact me to get it fixed.
Note that the rankings are based on my opinion, algorithm availability in cryptographic libraries, and which algorithms are typically used in modern protocols, such as TLS 1.3, Noise Protocol Framework, WireGuard, and so on. Such protocols and recommended practices make for the best guidelines because they have been approved by experienced professionals.
General Guidelines
Research, research, research: you often don't need to know how cryptographic algorithms work under the hood to implement them correctly, just like how you don't need to know how a car works to drive. However, you need to know enough about what you're trying to do, which requires looking up relevant information online or in books, reading the documentation for the cryptographic library you're using, reading RFC standards, reading helpful blog posts, and reading guidelines like this one. Furthermore, reading books about the subject in general will be beneficial, again like how knowing about cars can help if you break down. For a list of great resources, check out my How to Learn About Cryptography blog post.
Check and check again: it's your responsibility to get things right the first time around to the best of your ability rather than relying on peer review. Therefore, I strongly recommend always reading over security sensitive code at least twice and testing it to ensure that it's operating as expected (e.g. checking the value of variables line by line using a debugger, using test vectors, etc).
Peer review is great but often doesn't happen: unless your project is popular, you have a bug bounty program with cash rewards, or what you're developing is for an organisation, very few people, perhaps none, will look through the code to find and report vulnerabilities. Similarly, receiving funding for a code audit will probably be impossible.
Please don't create your own custom cryptographic algorithms (e.g. a custom cipher or hash function): this is like flying a Boeing 747 without a pilot license but worse because even experienced cryptographers design insecure algorithms, which is why cryptographic algorithms are thoroughly analysed by a large number of cryptanalysts, usually as part of a competition. By contrast, you rarely see experienced airline pilots crashing planes. The only exception to this rule is implementing something like Encrypt-then-MAC with secure, existing cryptographic algorithms when you know what you're doing.
Please avoid coding existing cryptographic algorithms yourself (e.g. coding AES yourself): cryptographic libraries provide access to these algorithms for you to prevent people from making mistakes that cause vulnerabilities and to offer good performance. Whilst a select few algorithms are relatively simple to implement, like HKDF, many aren't and require a great deal of experience to implement correctly. Lastly, another reason to avoid doing this is that it's not much fun since academic papers and reference implementations can be very difficult to understand.
Cryptographic Libraries
Use(In Order)
Libsodium: a modern, extremely fast, easy-to-use, well documented, and audited library that covers all common use cases, except for implementing TLS. However, it's much bigger than Monocypher, meaning it's harder to audit and not suitable for constrained environments, and requires the Visual C++ Redistributable to work on Windows.
Monocypher: another modern, easy-to-use, well documented, and audited library, but it's about half the speed of libsodium on desktops/servers, has no misuse resistant functions (e.g. like libsodium's secretstream() and secretbox()), only supports Argon2i for password hashing, allowing for insecure parameters (please see the Password Hashing/Password-Based Key Derivation Notes section), and offers no memory locking, random number generation, or convenience functions (e.g. Base64/hex encoding, padding, etc). However, it's compatible with libsodium whilst being much smaller, portable, and fast for constrained environments (e.g microcontrollers).
Tink: a misuse resistant library that prevents common pitfalls, like nonce reuse. However, it doesn't support hashing or password hashing, it's not available in as many programming languages as libsodium and Monocypher, the documentation is a bit harder to navigate, and it provides access to some algorithms that you shouldn't use.
LibHydrogen: a lightweight, easy-to-use, hard-to-misuse, and well documented library suitable for constrained environments. The downsides are that it's not compatible with libsodium whilst also running slower than Monocypher. However, it has some advantages over Monocypher, like support for random number generation, even on Arduino boards, and easy access to key exchange patterns, among other things.
Avoid(In Order)
A random library (e.g. with 0 stars) on GitHub: assuming it's not been written by an experienced professional and it's not a libsodium or Monocypher binding to another programming language, you should generally stay away from less popular, unaudited libraries. They are much more likely to suffer from vulnerabilities and be significantly slower than the more popular, audited libraries. Also, note that even experienced professionals make mistakes.
OpenSSL: very difficult to use, let alone use correctly, offers access to algorithms and functions that you shouldn't use, the documentation is a mess, and lots of vulnerabilities have been found over the years. These issues have led to OpenSSL forks and new, non-forked libraries that aim to be better alternatives if you need to implement TLS.
The library available in your programming language: most languages provide access to old algorithms (e.g. MD5 and SHA1) that shouldn't be used anymore instead of newer ones (e.g. BLAKE2, BLAKE3, and SHA3), which can lead to poor algorithm choices. Furthermore, the APIs are typically easy to misuse, the documentation may fail to mention important security related information, and the implementations will be slower than libsodium. However, certain languages, such as Go and Zig have impressive modern cryptography support.
Other popular libraries I haven't mentioned (e.g. BouncyCastle, CryptoJS, etc): these again often provide or rely on dated algorithms and typically have bad documentation. For instance, CryptoJS uses an insecure KDF called EVP_BytesToKey() in OpenSSL when you pass a string password to AES.encrypt(), and BouncyCastle has no C# documentation. However, this recommendation is too broad really since there are some libraries that I haven't mentioned that are worth using, like PASETO. Therefore, as a rule of thumb, if it doesn't include several of the algorithms I recommend in this document, then it's probably bad. Just do your research and assess the quality of the documentation. There's no excuse for poor documentation.
NaCl: an unmaintained, less modern, and more confusing version of libsodium and Monocypher. For example, crypto_sign() for digital signatures has been experimental for several years. It also doesn't have password hashing support and is difficult to install/package.
TweetNaCl: unmaintained, slower than Monocypher, doesn't offer access to newer algorithms, doesn't have password hashing, and does not zero out buffers.
Notes
If the library you're currently using/planning to use doesn't support several of the algorithms I'm recommending, then it's time to upgrade and take advantage of the improved security and performance benefits available to you if you switch.
Please read the documentation: don't immediately jump into coding something because that's how mistakes are made. Good libraries have high quality documentation that will explain potential security pitfalls and how to avoid them.
Some libraries release unauthenticated plaintext when using AEADs: for example, OpenSSL and BouncyCastle apparently do. Firstly, don't use these libraries for this reason and the reasons I've already listed. Secondly, never do anything with unauthenticated plaintext; ignore it to be safe.
Older doesn't mean better: you can argue that older algorithms are more battle tested and therefore proven to be a safe choice, but the reality is that most modern algorithms, like ChaCha20, BLAKE2, and Argon2, have been properly analysed at this point and shown to offer security and performance benefits over their older counterparts. Therefore, it doesn't make sense to stick to this overly cautious mindset of avoiding newer algorithms, except for algorithms that are still candidates in a competition (e.g. new post-quantum algorithms), which do need further analysis to be considered safe.
You should prioritise speed: this can make a noticeable difference for the user. For example, a C# Argon2 library is going to be significantly slower than Argon2 in libsodium, meaning unnecessary and unwanted extra delay during key derivation. Libsodium is the go-to for speed on desktops/servers, and Monocypher is the go-to for constrained environments (e.g. microcontrollers).
Stars: 395
Extra_End
Reference from this Article:
Cryptography Guidelines: Guidance on implementing cryptography as a developer.
These guidelines were inspired by this Cryptographic Best Practices gist, Latacora's Cryptographic Right Answers, and Crypto Gotchas, which is licensed under the Creative Commons Attribution 4.0 International License. The difference is that I mention newer algorithms and have tried to justify my algorithm recommendations whilst also offering important notes about using them correctly.
Stars: 685
Author of Blog:Aaron Toponce
Cryptographic Best Practices
Extra_End
Connor Leechconnor11528 followed James Bradygoodgravy18/03/2021
Extra:About
Redirect ActiveRecord (Rails) reads to replica databases while ensuring all writes go to the primary database.
This is a slight modification of Rocket Job's original library, simply renaming it from active_record_slave to active_record_replica.
In order to more clearly distinguish the library from active_record_slave, we also incremented the major version – it is, however, functionally equivalent.
active_record_replica redirects all database reads to replica instances while ensuring that all writes go to the primary database. active_record_replica ensures that any reads that are performed within a database transaction are by default directed to the primary database to ensure data consistency.
Production Ready. Actively used in large production environments.
- 1.1 Redirecting reads to a single replica database.
- 1.2 Works with any database driver that works with ActiveRecord.
- 2. Supports all Rails 3, 4, or 5 read apis.
- 2.1. Including dynamic finders, AREL, and ActiveRecord::Base.select.
- 2.2. NOTE: In Rails 3 and 4, QueryCache is only enabled for BaseConnection by default. In Rails 5, it's enabled for all connections. (PR)
- 3. Transaction aware
- 3.1. Detects when a query is inside of a transaction and sends those reads to the primary by default.
- 3.2. Can be configured to send reads in a transaction to replica databases.
- 4. Lightweight footprint.
- 5. No overhead whatsoever when a replica is not configured.
- 6. Negligible overhead when redirecting reads to the replica.
- 7. Connection Pools to both databases are retained and maintained independently by ActiveRecord.
- 8. The primary and replica databases do not have to be of the same type.
- 8.1. For example Oracle could be the primary with MySQL as the replica database.
- 9. Debug logs include a prefix of Replica: to indicate which SQL statements are going to the replica database.
# Read from the replica database
r = Role.where(name: 'manager').first
r.description = 'Manager'
# Save changes back to the primary database
r.save!
Example showing how reads within a transaction go to the primary
Role.transaction do
r = Role.where(name: 'manager').first
r.description = 'Manager'
r.save!
end
Stars: 160
Extra_End
RSA is deceptively simple (and fun)15/01/2024
While reading Real-World Cryptography, I came across the "million message attack". This is an attack that Daniel Bleichenbacher demonstrated in 1998, which effectively broke RSA with a particular encoding function called PKCS #1. It was only mentioned briefly, so I dug in and decided to try to understand the attack, eventually to implement it.
Most crypto libraries do not ship with a vulnerable implementation of this, for good reason. It's been broken! And if I implement the full attack against a real implementation, it would also come with using realistic key size.
Instead, I decided to implement RSA myself so that I could implement a weak encoding scheme so I could implement the Bleichenbacher attack! So far, I have an implementation of RSA and of PKCS (the vulnerable one). The basics of RSA took an hour to implement, then what felt like days to debug. And now it (seemingly) works! The attack will follow soon, with any luck.
What's RSA, anyway?
RSA is a public-key cryptosystem, in contrast to symmetric key cryptosystems. With symmetric keys, the sender and the recipient both share a key and use the same key to encrypt and decrypt the message. In contrast, public-key cryptosystems have a key pair, a public and a private key. The public key can be used to encrypt messages and the private key to decrypt them1.
One of the drawbacks of a symmetric key system is that you have to share the key. This means you have to use a different secure channel to transmit the key, and then both parties need to be really careful to keep it a secret. This isn't manageable for a system with a lot of participants, like the internet!
But symmetric key encryption is often very fast, and we have some of the operations for it even baked into hardware. It would be nice to use it where we can for that efficiency.
In contrast, with public-key cryptography, you can freely share the public key, and anyone can then use that to encrypt a message to you. This means you do not need a separate secure channel to share the key! (Although this ignores the whole problem of validating that the key comes from the right person, so you're not having your connection spoofed by an interloper.) And this is great! This is what RSA gives us, but the computations for RSA are slow and the messages you can send are also small.
In practice, RSA was used (regrettably, sometimes still is) to establish a secure connection and perform a key exchange, and then the keys you exchange let you use symmetric key encryption. You probably shouldn't use RSA. Modern alternatives exist that are better, like Curve25519 and other forms of elliptic-curve cryptography.
But for worse, we run into RSA, and it's also a fun historical artifact! It's worth understanding in, and hey, implementing it is just plain fun.
The basics of RSA
RSA is a nicely elegant cryptosystem. Its security is based on the difficulty of factoring the product of large prime numbers, and in its purest form it has no known breaks2.However, as mentioned above, depending on how data is encoded, particular uses of it can be broken.
The basic operations of it are straightforward to express. There are three components:
- 1. Generating keys
- 2. Encrypting and decrypting!
- 3. Encoding messages
We'll go through each of those, starting with generating keys.
Generating your keys
First of all, what even is a key? We know that it's used to encrypt or decrypt a message, but what is inside it?
For RSA, a key comprises two numbers. One of these is called the exponent and one is the modulus. A key could be (exp=3, mod=3233), for example. It's really just this pair of numbers3.
The reason the pieces of it are called the exponent and modulus is because of how we use them! RSA relies onmodular arithmetic (like clock math, if you're not familiar). These are the exponents and modulus for the encryption or decryption operations which we'll see later.
To generate a key, you follow a short procedure.
- 1. First, pick two prime numbers which we'll call p and q. Then we compute n = p * q.
- 2. Compute a number t = lcm(p-1, q-1). This is the totient, and we use this as our modulus for generating the keys but then never again.
- 3. Pick the public exponent, which we'll call e. The requirement is that it shares no factors with t and is greater than 2. One simple way is to start with 3, but go up through the primes until you find one coprime with t. Choosing 65537 is also quite common, since it's small enough to be efficient for encryption but large enough to avoid some particular attacks.
- 4. Calculate the private exponent, which we'll call d. We compute this as d = e^-1 mod t, or the inverse of e in our modulus.
Now you haved and e, the private and public exponents, and you have n, the modulus. Bundle those up into two tuples and you have your keys!
Let's work an example quickly to see how it ends up. For our primes, we can choose p = 17 and q = 29. So then n = 493.
Now we find t = lcm(17 - 1, 29 - 1) = lcm(16, 28) = 112 . We'll choose e = 3, which works since 2 < 3 and gcd(3, 112) = 1 so we know they share no factors. Now we compute 4 d = e-1 = 3-1 = 75 mod 112. And then we have our keys!
Our public key is (exp=3, mod=493), and our private key is (exp=75, mod=493). We'll use these again in our examples on encrypting and decrypting!
Extra:Extra_End
A reverse proxy as a configurable package on top of Kestrel
Sign me up! Maybe I live under a rock, but I feel like this deserves a ton more attention.
About
A toolkit for developing high-performance HTTP reverse proxy applications.
Extra:Stars: 7.6k
One popular Author, Milan Jovanović @mjovanovictech, Practical .NET and Software Architecture Tips | Microsoft MVP
Link to the article:
https://www.milanjovanovic.tech/blog/implementing-an-api-gateway-for-microservices-with-yarp
Extra_End
Welcome to Lil'Log GitHub Link
Hi, this is Lilian. I'm documenting my learning notes in this blog. Besides, I'm leading a team working on practical AI safety and alignment at OpenAI. Based on the number of grammar mistakes in my posts, you can tell how much ChatGPT is involved 😉.
Author of Blog:Lilian
Followers on GitHub: 7k
Other Blog Posts by the Author
Extra:4. Some Math behind Neural Tangent Kernel8/09/2022
Neural networks are well known to be over-parameterized and can often easily fit data with near-zero training loss with decent generalization performance on test dataset. Although all these parameters are initialized at random, the optimization process can consistently lead to similarly good outcomes. And this is true even when the number of model parameters exceeds the number of training data points.
3. Learning Word Embedding15/10/2017
2. Predict Stock Prices Using RNN: Part 222/07/2017
Link to GitHub: lilianweng/stock-rnn
Stars: 1.7k
Predict stock market prices using RNN
1. Predict Stock Prices Using RNN: Part 18/07/2017
This is a tutorial for how to build a recurrent neural network using Tensorflow to predict stock market prices. The full working code is available in github.com/lilianweng/stock-rnn. If you don’t know what is recurrent neural network or LSTM cell, feel free to check my previous post.
One thing I would like to emphasize that because my motivation for writing this post is more on demonstrating how to build and train an RNN model in Tensorflow and less on solve the stock prediction problem, I didn’t try hard on improving the prediction outcomes. You are more than welcome to take my code as a reference point and add more stock prediction related ideas to improve it. Enjoy!
Predict stock market prices using RNN
One thing I would like to emphasize that because my motivation is more on demonstrating how to build and train an RNN model in Tensorflow and less on solve the stock prediction problem, I didn't try too hard on improving the prediction outcomes. You are more than welcome to take this repo as a reference point and add more stock prediction related ideas to improve it. Enjoy.
Check my blog post "Predict Stock Prices Using RNN": Part 1 and Part 2 for the tutorial associated.
-
1. Make sure
tensorflow
has been installed. 2. First download the full S&P 500 data from Yahoo! Finance ^GSPC (click the "Historical Data" tab and select the max time period). And save the .csv file to
data/SP500.csv
.3. Run
python data_fetcher.py
to download the prices of individual stocks in S & P 500, each saved todata/{ { stock_abbreviation.csv } }
. (NOTE: Google Finance API returns the prices for 4000 days maximum. If you are curious about the data in even early times, try modifydata_fetcher.py
code to send multiple queries for one stock. Here is the data archive (stock-data-lilianweng.tar.gz) of stock prices I crawled up to Jul, 2017. Please untar this file to replace the "data" folder in the repo for test runs.)4. Run
python main.py --help
to check the available command line args.5. Run
python main.py
to train the model.
For examples,
- Train a model only on SP500.csv; no embedding
python main.py --stock_symbol=SP500 --train --input_size=1 --lstm_size=128 --max_epoch=50
Extra_End
Analyzing Data 180,000x Faster with Rust20/10/2023
This note documents one of my recent adventures in performance optimization with Rust. By following along, hopefully you'll learn something about how to write fast Rust.
Here's the context: imagine you have data from an online exam where a set of users answered a set of questions. The raw data looks like this:
[
{
"user": "5ea2c2e3-4dc8-4a5a-93ec-18d3d9197374",
"question": "7d42b17d-77ff-4e0a-9a4d-354ddd7bbc57",
"score": 1
},
{
"user": "b7746016-fdbf-4f8a-9f84-05fde7b9c07a",
"question": "7d42b17d-77ff-4e0a-9a4d-354ddd7bbc57",
"score": 0
},
/* ... more data ... */
]
PsuedoCode:
func k_corrset($data, $k):
$all_qs = all questions in $data
for all $k-sized subsets $qs within $all_qs:
$us = all users that answered every question in $qs
$qs_totals = the total score on $qs of each user in $us
$grand_totals = the grand score on $all_qs of each user in $us
$r = correlation($qs_totals, $grand_totals)
return $qs with maximum $r
Python Baseline:
from itertools import combinations
import pandas as pd
from pandas import IndexSlice as islice
def k_corrset(data, K):
all_qs = data.question.unique()
q_to_score = data.set_index(['question', 'user'])
all_grand_totals = data.groupby('user').score.sum().rename('grand_total')
corrs = []
for qs in combinations(all_qs, K):
qs_data = q_to_score.loc[islice[qs,:],:].swaplevel()
answered_all = qs_data.groupby(level=[0]).size() == K
answered_all = answered_all[answered_all].index
qs_totals = qs_data.loc[islice[answered_all,:]] /
.groupby(level=[0]).sum().rename(columns={'score': 'qs'})
r = qs_totals.join(all_grand_totals).corr().qs.grand_total
corrs.append({'qs': qs, 'r': r})
corrs = pd.DataFrame(corrs)
return corrs.sort_values('r', ascending=False).iloc[0].qs
data = pd.read_json('scores.json')
print(k_corrset(data, K=5))
Note that each user only answered a subset of all possible questions, and all scores are either 0 or 1.
Here's the problem: given a size k, which set of k questions has the highest correlation with overall performance? We'll call this the k-CorrSet problem. A simple brute-force algorithm for solving the k-CorrSet problem looks like this pseudocode:
We are going to implement several variations on this algorithm to see how fast we can make it.
Can you explain in depth on this?
The algorithm iterates through all possible k-sized subsets of questions, calculates the correlation between the scores on that subset and the grand scores on all questions, and returns the subset with the maximum correlation.
ChatGPT:
Certainly! Let's break down the key steps of the algorithm that iterates through all possible k-sized subsets of questions, calculates the correlation, and returns the subset with the maximum correlation.
Here's a more detailed explanation:
1. Generate all k-sized subsets of questions:
The algorithm starts by obtaining all possible questions from the given dataset. Then, it iterates through all k-sized subsets of these questions. For example, if k is 3, it would consider all possible combinations of 3 questions out of the total set of questions.
2. Identify users who answered every question in the subset:
For each k-sized subset of questions, the algorithm identifies all users who answered every question in that subset. This is important because the correlation calculation requires data from users who answered all questions in the subset.
3. Calculate total scores on the subset for each user:
Once the algorithm has the subset of questions and the corresponding users, it calculates the total score on that subset for each user. It sums up the scores of each user for the questions in the subset.
4. Calculate the grand total scores on all questions for each user:
Simultaneously, the algorithm calculates the grand total scores on all questions for each user. This involves summing up the scores of each user for all questions, not just the subset.
5. Calculate the correlation between subset scores and grand total scores:
With the total scores on the subset and the grand total scores for each user, the algorithm calculates the correlation between these two sets of scores. The correlation coefficient is a measure of the linear relationship between two sets of data. It ranges from -1 to 1, where -1 indicates a perfect negative correlation, 1 indicates a perfect positive correlation, and 0 indicates no correlation.
The correlation calculation could use statistical methods such as Pearson correlation coefficient, which measures the linear correlation between two variables. The formula for Pearson correlation is:
𝑟 = ∑ (𝑥𝑖 − 𝑥¯)(𝑦𝑖 − 𝑦¯ ) / √ ∑ (𝑥𝑖 − 𝑥¯ )^2 ∑ (𝑦 − 𝑦¯ )^2
Where:
𝑥𝑖xi and 𝑦𝑖yi are the individual scores of the users on the subset and grand total, respectively.
𝑥¯xˉ and 𝑦¯yˉ are the means of the scores on the subset and grand total, respectively.
6. Return the subset with the maximum correlation:
After calculating the correlation for each k-sized subset, the algorithm identifies the subset with the maximum correlation coefficient and returns it as the result. This subset is considered to have the highest correlation with overall performance.
Note:
The described algorithm is a brute-force approach, meaning it considers all possible subsets and calculates correlations for each. While it provides a straightforward solution to the k-CorrSet problem, it might be computationally expensive for large datasets. The author's exploration in Rust likely involves optimizing this algorithm or exploring alternative approaches to improve its efficiency.
Extra:Stars: 42
Link to the article:
Analyzing Data 180,000x Faster with Rust
Extra_End
osanseviero followed Christopher Fleetwood10/07/2021
I am a Machine Learning Engineer at HuggingFace in London, UK.
An exploration of fMRI timeseries similarity metrics
In order to perform classification on a functional brain scan it first undergoes many preprocessing steps. One of these steps is the transformation from the timeseries output of the fMRI scan, transforming a 𝑚 × 𝑛 m×n (where 𝑚 m is the number of timepoints recorded and 𝑛 n is the number of brain regions used) to an 𝑛 × 𝑛 n×n matrix of similiarity values (called a connectome). This similarity value is a measure of the neural synchronization between the 2 regions.
So how do we quantify the similarity of 2 different timeseries? This blog post will explore the common ways of quantifying time series similarity in a neuroscientific setting. Before we get into the actual methods used to calculate time series similarity, we need to cover the corner stone of almost all of the methods we are about to explore - covariance.
Covariance
Covariance is simply a measure of how two random variables change together. Below is the formula for calculating covariance:
Σ=E[(X−E[X])(X−E[X]) T ]
In the case of fMRI, we have a multivariate random variable, allowing us to use Maximum Likelihood Estimation to estimate the covariance matrix. Below is a toy example of our estimated covariance matrix.
1. Covariance is bound between − ∞ −∞ and ∞ ∞ making it less suitable for downstream classifiers.
2. Covariance coefficients are not standardized and cannot be used to quantify the strength of the relationship.
4. When the number of features is large relative to the number of observations, the sample/empirical covariance matrix has excessive estimation error.
3. Symmetric Positive semi-definite (SPD) matricies do not naturally form a Euclidean space (this will be important later).
Many of the following approaches will aim to address some or all of the above drawbacks with empirical covariance.
To address the excessive estimation error, it is common to perform a transformation to the covariance coefficients, known as "shrinkage". In their seminal paper, "Honey, I shrunk the Sample Covariance Matrix" [1], Ledoit & Wolf proposed using shrinkage to regularize the sample covariance matrix. "Shrinkage" as the name implies, pulls the most extreme covariance coefficients towards more central values. This not only resolves our excessive estimation error, it can also make the matrix easily invertable by encouraging numerical stability. (The interested reader should consult the scikit-learn docs [2] )
Now that we have a well conditioned covariance matrix, we can attempt to address some of the other identified drawbacks.
Canonical Approaches
Pearson's correlation coefficient (Pearson's 𝑅 R) or simply correlation, is the most commonly used method to quantify similarity between 2 fMRI timeseries. Correlation is a linear metric computed from the covariance of the 2 timeseries. Below is the mathematical formula to compute correlation for a pair of random variables:
Correlation is widely used in neuroscience as it has long statistical history and is bound between -1 and 1. However, correlation does have some disadvantages. The below figure should demonstrate one clearly:
Due to correlations linear nature, the same timeseries being slightly out of phase causes a huge decrease in the correlation value. Additionally, correlation provides no distinction between whether 2 regions are directly connected or indirectly connected via another region. To account for this, we can use partial correlation!
Partial correlation is a variant of PCC that attempts to address distinguishing between direct and indirect connections. This is done by computing correlation between regions after regressing all other timeseries. Partial correlation is computed from the inverse of the covariance matrix (this is where the shrinkage comes in handy), also known as the precision matrix. Below is the mathematical formula for computing partial correlation for a pair of random variables:
Extra:Author of Blog:Chris
Other Blog Posts by the Author
1. Layer Normalization as fast as possible. Details: One pass algorithm, Two-pass algorithm, Welford's algorithm, and Implementing Welford's Algorithm11/12/2023
2. Running LLMs with Browser in Rust26/04/2023
4. An exploration of fMRI timeseries similarity metrics10/07/2021
3. Rust based ML model analyzer18/10/2022
Extra_End
Hi! My name is Zachary Mueller, and I'm a Machine Learning Software Engineer at 🤗. I majored in Software Design and Development and I have minors in both Computer Science and Environmental Science.
I have a heavy passion for Deep Learning and Open Source libraries. As a result, below you will find some notable articles I've written, a few courses I've made, some of software libraries I've written, interesting projects, and the open source libraries I have tried to contribute the most to.
Author of Blog:Zach Mueller
Followers on GitHub: 1.2k
Other Blog Posts by the Author
Extra:- M: Linear Algebra
- T: NLP, Matrix Calculus
- Th: Foundations, Matrix Calculus, Linear Algebra
- F: Foundations, NLP
- Sa: NLP, Linear Algebra, Matrix Calc, Foundations
- The @ symbol is used when doing matrix multiplication, where we multiply each row by the column, and then sum them together.
- 76.5% of people will be asymptomatic
- 15.25% of people will be symptomatic
- 6.45% of people will have AIDS
- 1.8% of people will die as a result of their illnesses
1. Summer Smackdown - Week 17/07/2019
These posts will most likely wind up being a bit of an odd bunch in terms of formatting until I figure out a style I like and enjoy, as the goal is to merge all Four of the lessons into one big post.
Given I wanted to update all of these blogs on Sundays, I decided I would include the first ‘day’ of work as well.
Overall how the schedule I plan to follow looks is as such:
As I started this goal on a Saturday, this week there will not be much in my recap, but I’ll be as inclusive as I can into the small lessons I learned.
Computational Linear Algebra
We start off learning about the Markov Chain, a way to describe a sequence of events where the probably of each event depends on the state of the previous event. Also known as the next event is determined by the previous event. The course utilizes the Numpy library to hold matrix multiplications to solve the various problems. My notes go through and futher explain what each answer means in context.
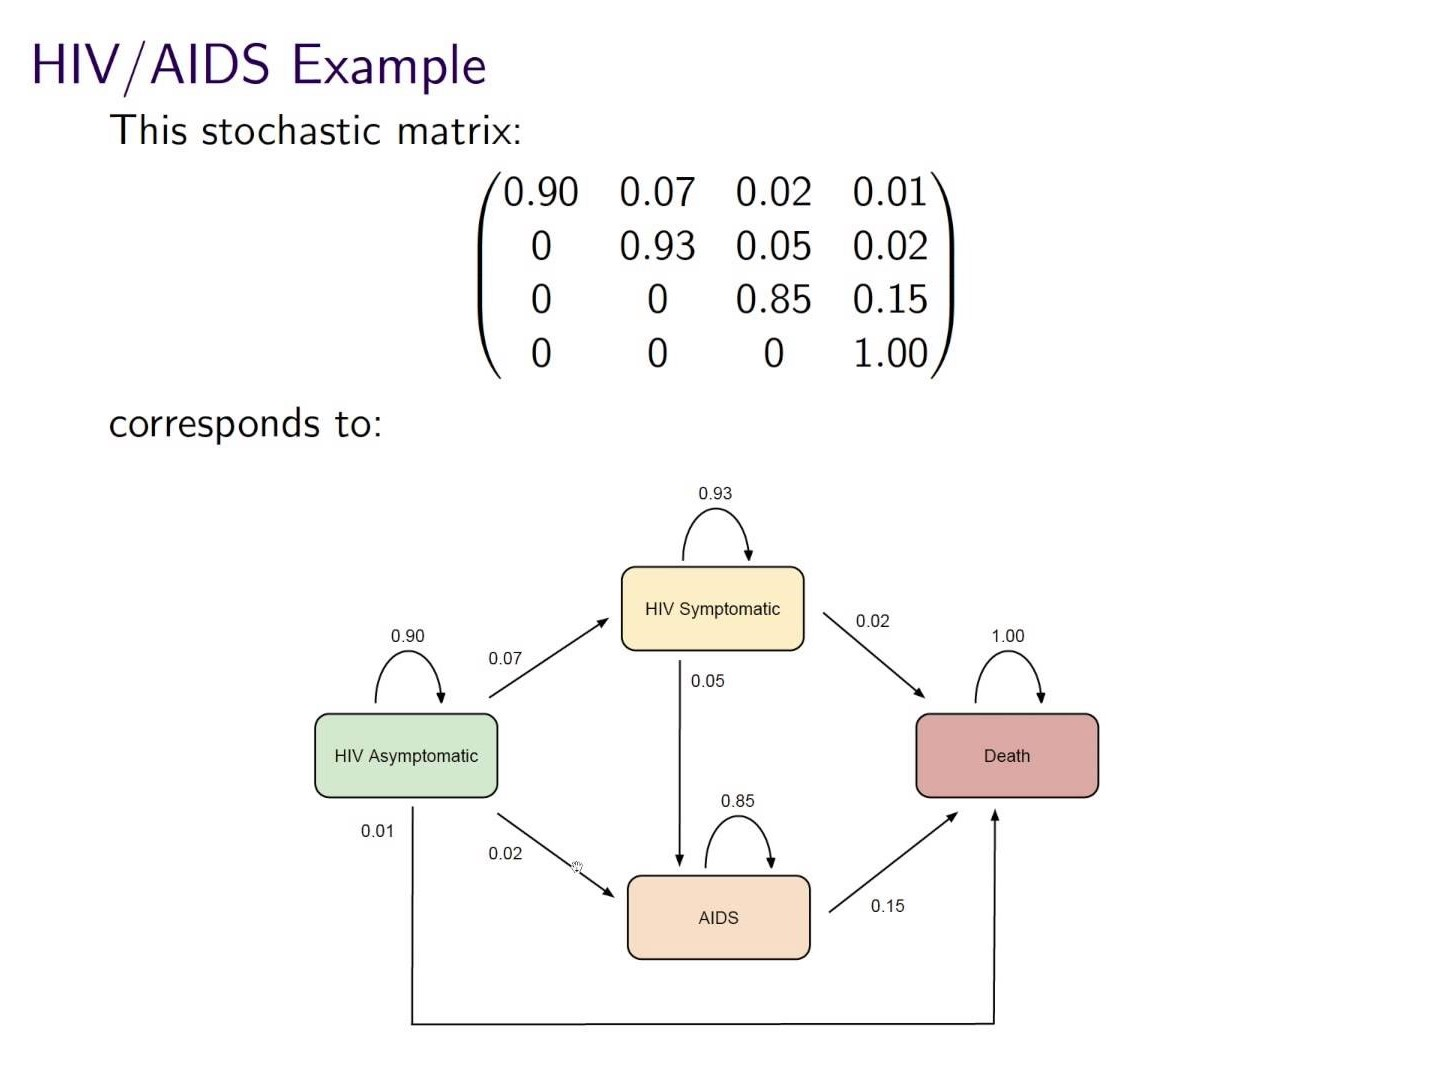
For example, problem 1 is about using a stochastic matrix, which is a square probablity matrix, in order to predict how health-related incidents will be in the following year.
We start off knowing that the current year had 85% asymtpmatic, 10% symptomatic, 5% AIDS, and 0% death. Next, we were given the following probability table:
Now that we’re here, we use matrix multiplication to get our answer:
import numpy as np
i = np.array([[.85,.1,.05,0]])
mat = np.array([[.9,.07,.02,.01],
[0,.93,.05,.02],
[0,0,.85,.15],
[0,0,0,1]])
res = mat.T @ i.T
One thing Jeremy points out is another way to write the above:
(i @ mat).T)
which saves us a few seconds of code, and looks cleaner.
The answer winds up being:
array([[0.765 ],
[0.1525],
[0.0645],
[0.018 ]])
However, what does the answer mean? Well, it means that within the next year:
We’ve started using some matrix multiplication to get solutions, but can we get a bit more advanced with it?
Take problem 2:
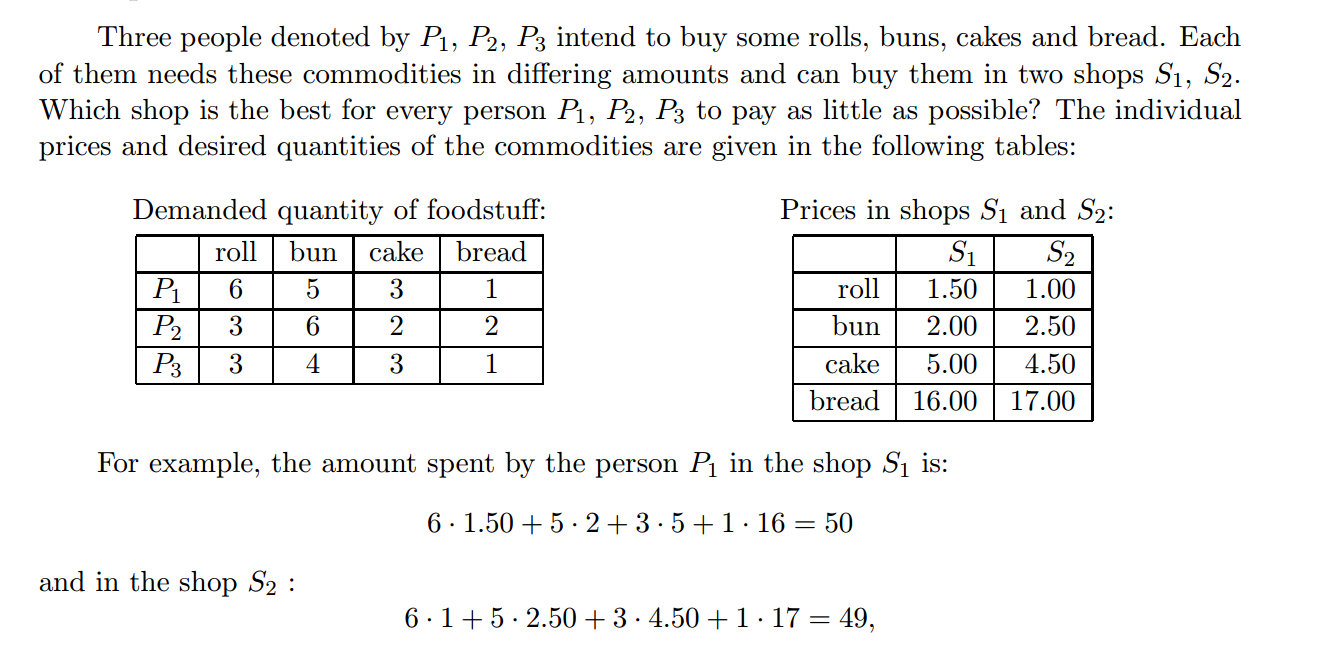
Given the above table, figure out which store is best for what individual. This is a straight matrix by matrix multiplication problem where we will have ‘dem’ represent a matrix of the demand per individual, and ‘p’ be the prices for each item in two particular shops.
dem = np.array([[6, 5, 3, 1],
[3,6,2,2],
[3,4,3,1]])
p = np.array([[1.5, 1],
[2., 2.5],
[5., 4.5],
[16., 17.]])
We yet again solve this by doing dem@p
, which gives us a table that looks like the following:
array([[50. , 49. ],
[58.5, 61. ],
[43.5, 43.5]])
The above table is now described as having the rows be an individual, and the columns being a particular store with the content as the price they would pay for the items they need. We can see that for Person 1 shop 2 would be the best, for Person 2 shop 1 would be the best, and for Person 3 they could go to either one.
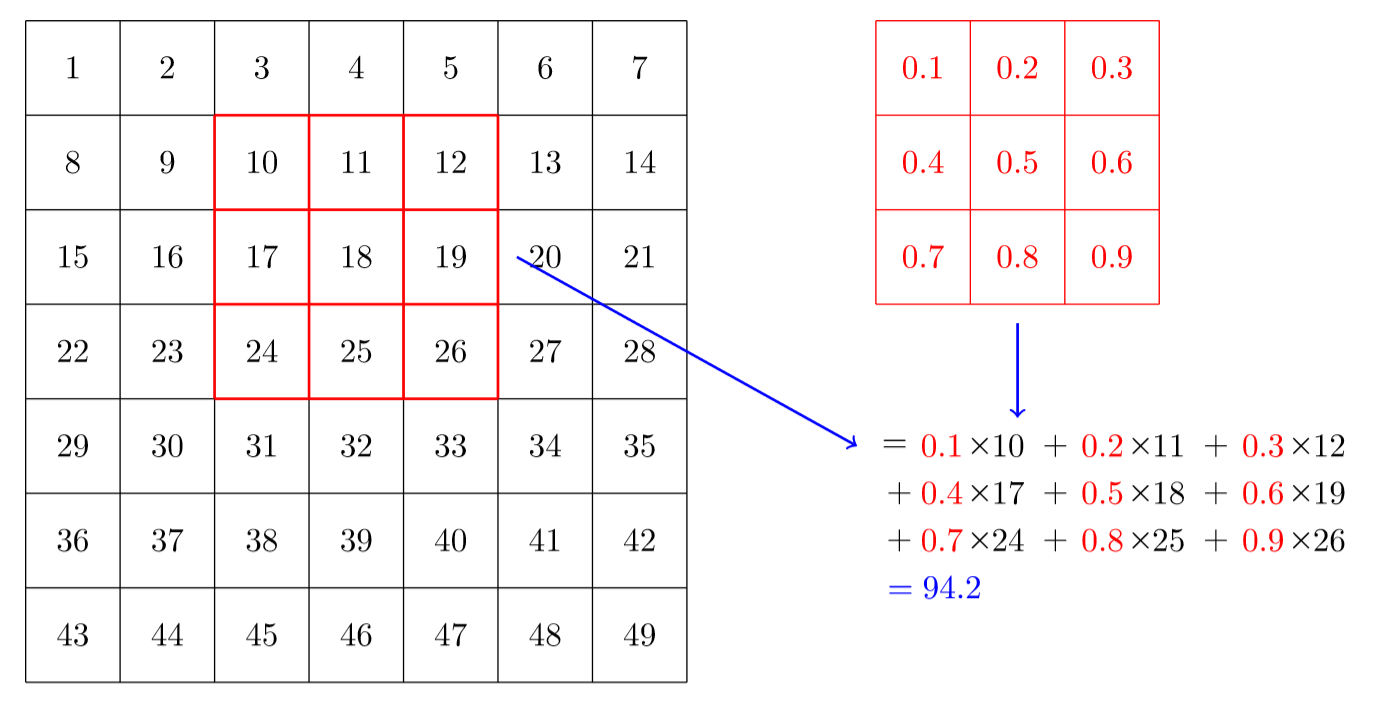
Then Rachel goes further to describe images a little bit and convolutions, which I was already familar with from the Practical Deep Learning for Coders course, however this Medium article she mentions I found especially helpful: CNNs from Different Viewpoints
What this helped show for me was how matrix multiplication is actually applied within these Neural Networks we are generating through the Fast.AI library, especially the following image:
Here we have a 2x2 matrix (filter) being applied on a single-channel image (3x3), to get our four results: P,W,R,S. I enjoy this view of how our layers are working as I can see each product mapped with corresponding coordinates, versus a Neural Network viewpoint:
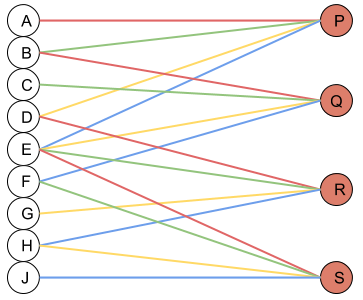
Where alpha, beta, gamma, etc are the connections or lines from each node to result.
This is as far as I got yesterday, so next week lesson 1 should be fully completed.
Matrix Calculus
One thing Jeremy suggests us to do during the Foundations course is turn paper to code, so I wanted to apply that to this course, despite it being pure-math heavy. The goal of doing this was just to know how to apply various scary-looking math into code easier, as my experience before this was none.
This week I went over the Introduction and Review sections of the paper, as I last took AP Calculus senior year of high school… It’s been a few years.
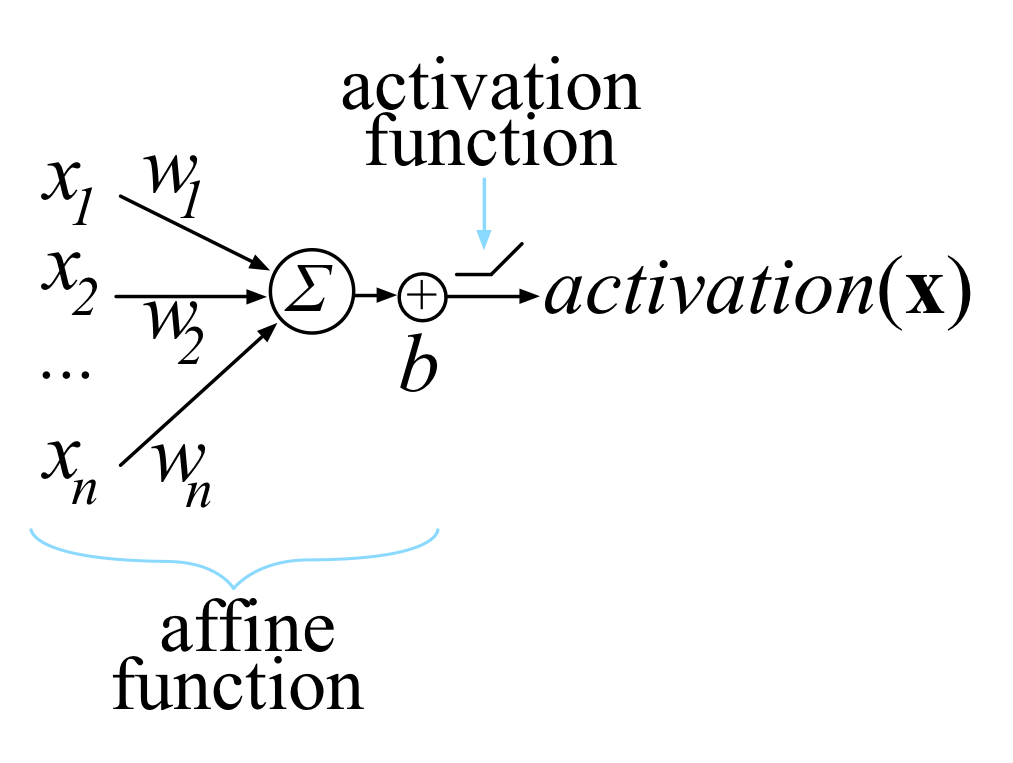
So! The introduction segment. Any activation of a single unit inside a nerual network is done using the “dot product of an edge weight vector, w, with an input vector x, plus a scalar bias b.” Okay. That was a lot thrown out at me. Let’s make that a bit easier. The above can also be written as y=mx+b, a basic linear function where m and x are both matrix’s. The better way to right that would be like so:
Where n
and i
are how many layers or activation uits we have. This could then also be written as z = w * x + b
where z, the 'affine function' (linear function), is derived from a linear unit that clips negative values to zero from the bias.
Another way to visualize a neuron is like so:
Now, when we are training our models, all we are doing is choosing a w and b so we can get our desired output for all of our inputs. We can help choose and navigate what are our best options by using a loss function to grade the final activations to the target for all of our inputs. To help minimize, a variation of gradient decent is used where we take the partial derivitive (gradient) of an activation with respect to w and b.
In laymans terms? Gradually tweaking w and b in order to make some loss function as close to zero as we can.
The next example shown in the paper is taking a function we’re familair with, Mean Squared Error, and showing us its derivitive (gradient):
At first glance that looks absolutely disgustingly terrifying. But let’s try to break it down into code instead and see if we can try to understand it better.
So first, the original where N is the number of inputs
def loss(N):
y = 0
for x in range(N):
y += (targ(x) - activ(x)) ** 2
return y/N
Okay, doesn’t look too bad now. For all inputs, we take the square of our target minus our activation (or our answer). Let’s look at that derivitive now. I made two functions, actf and grad as we have that interior summation.
def grad(N, w, b):
y = 0
for x in range(N):
y += (targ(x) - actf(x)) ** 2
return y/N
def actf(x, w, b):
y = 0
for i in range(abs(x)):
y += (w[i] * x[i] + b)
return max(0, y)
That looks a bit better, we can see that w and x are both going to be matrix’s, weight and input respectivly, and b is our bias.
Alright, not as scary anymore. The last bit I did was a review on the Scalar derivative rules, and attempting to recreate this in code. For this I found the sympy library a huge help, as we can visualize functions and their derivitives.
For example, say I have the equation
We can write this in code as y = 3*x**2
. Well, if we want the derivitive all we have to do is first declare ‘x’ as a ‘Symbol’, then use the .diff
function to get the derivitive!
The result will give us 6*x
, what we were expecting.
Extra_End
Hey @karpathy I tinkered with minbpe until I got the tokenization process to run 10x faster, still in python. Safely merging multiple token pairs simultaneously was the most interesting find. Here's the notebook: https://t.co/MkTecNoWNP
— Alexander Morgan (@lexandermorgan) April 12, 2024
MinBPE Speedups
Updates
This notebook started with a 5X speed improvement, then 10X, and now is at 25X+. If you"re returning to this notebook after some time, be sure to read through to the end.
Optimization Exploration of Andrej Karpathy's Tokenization Tutorial
One way of actively engaging with new concepts presented in code, is to try to optimize that code. Andrej's video tutorial on tokenization was focused on code clarity since his objective was to demonstrate the ideas and processes of tokenization. If you haven't watched that video and worked through the notebook, definitely do that first. This notebook shares the best speed-ups I found and the things I learned about tokenization along the way.
Algorithmic Complexity of Tokenization
Every time we add a new token to our vocabulary, we make a slightly edited copy of the whole list of tokens. Very roughly speaking the complexity of tokenization is equal to:
Tokens×Vocabulary
If we want to get picky, each time we go through the process it does slightly lower the length of the list of tokens. And the "vocabulary" here is just the additions to the vocabulary beyond the 256 initial tokens. But GPT4 used about 100,000 tokens, so almost all of them were additions. Tokens×Vocabulary is a lot work to do, so let's get to work speeding it up.
Ground Rules
All the timings referenced were measured in a very simple manner using timeit in Python 3.10.11 on an m1 macbook air. In each case I leave Andrej's methods the same except I remove any print statements. Alternatives to his methods always have the same name, but with 2 or 3 added on.
The cost/benefits of these tweaks will depend on your number of tokens and vocabulary size and I only tested them out on the two texts Andrej provided in his notebook. The shorter of these is provided below to so you can test out these functions (the longer one causes pagination issues in colab so I'm not including it). I'll always refer to speed improvements as a percentage reduction in runtime as in, going from 10 seconds to 8 seconds is a 20% reduction in runtime. In all cases, the end result is the same.
text = "Unicode! 🅤🅝🅘🅒🅞🅓🅔‽ 🇺🇳🇮🇨🇴🇩🇪! 😄 The very name strikes fear and awe into
the hearts of programmers worldwide. We all know we ought to “support Unicode” in our software
(whatever that means—like using wchar_t for all the strings, right?). But Unicode can be abstruse,
and diving into the thousand-page Unicode Standard plus its dozens of supplementary annexes, reports,
and notes can be more than a little intimidating. I don’t blame programmers for still finding
the whole thing mysterious, even 30 years after Unicode’s inception."
tokens = text.encode("utf-8") # raw bytes
tokens = [*map(int, tokens)] # convert to a list of integers in range 0..255 for convenience
Optimize get_stats() and merge():
get_stats() vs collections.Counter vs collections.defaultdict
The get_stats function turns a list of tokens into a dictionary mapping consecutive pairs of tokens to the number of times that consecutive pair appears in the whole list. Since the "counter" dictionary refers to itself when incrementing its values in the for loop, get_stats can't be written as a dictionary comprehension. get_stats is a very clear "show your work" version of what Python's collections.Counter does. You can also imagine doing this using a defaultdict, giving us three potential implementations:
from collections import Counter, defaultdict
def get_stats(ids):
counts = {}
for pair in zip(ids, ids[1:]): # Pythonic way to iterate consecutive elements
counts[pair] = counts.get(pair, 0) + 1
return counts
def get_stats2(ids): # using collections.Counter
return Counter(zip(ids, ids[1:]))
def get_stats3(ids): # using collections.defaultdict
counts = defaultdict(int)
for pair in zip(ids, ids[1:]):
counts[pair] += 1 # the defaultdict makes it safe to reference a missing key, saving us the .get calls
return counts
Comparing the runtimes of the three implementations above, collections.Counter (get_stats2) wins with a ~50% reduction in runtime compared to get_stats when testing on Andrej"s longer sample text. Not bad! It depends on the length and distribution of the token list, but it seems reliably faster on non-trivial token list sizes. The accepted answer to this stack overflow question explains the cost/benefit of collections.Counter pretty well. The defaultdict implementation in get_stats3 is actually slightly slower on Andrej's short demo text, but provides a ~25% reduction in runtime on the longer text.
merge() vs List Comprehension
The merge function takes a list of tokens, a target pair of tokens, and a new token to replace the target pair with. It returns a new list tokens which is a slightly modified copy of the original. Keeping the relative simplicity of the function in mind will help to optimize it. Here is the original implementation:
def merge(ids, pair, idx):
# in the list of ints (ids), replace all consecutive occurences of pair with the new token idx
newids = []
i = 0
while i < len(ids):
# if we are not at the very last position AND the pair matches, replace it
if i < len(ids) - 1 and ids[i] == pair[0] and ids[i+1] == pair[1]:
newids.append(idx)
i += 2
else:
newids.append(ids[i])
i += 1
return newids
Since we're just copying a list plus a tiny amount of logic, the structure of the loop is an uncommonly large proportion of the runtime. The loop condition while i < len(ids) will run once for every token in the ids list. We always need to do the comparison, but we don't need all those calls to python's len function. So if we move that out of the loop we only have 1 call to len instead of 1 for each token. Calling that variable stop the first few lines look like this:
newids = []
i = 0
stop = len(ids)
while i < stop:
Then the first thing we see in the loop is another call to len, this time with - 1 tagged on, and another comparison of that length to i. We can omit all that if we make this the condition at the top of the while loop. Adapting our stop variable we now have:
newids = []
i = 0
stop = len(ids) - 1
while i < stop:
if ids[i] == pair[0] and ids[i+1] == pair[1]:
That eliminates a ton of work but it does fail to consider the last token in the ids list. We can't just add the last one by default, because the last two tokens might have gotten merged. But if the last pair resulted in a merge, then i should go from being 1 less than stop to 1 more than stop since we iterate by 2 in that case. So we can add the last token if i == stop once we're outside of the loop. It might seem a little awkward to have to handle the last token as a special case, but the way you enter and exit a loop often requires special attention, so this is pretty normal. The payoff is great as merge2 brings a ~50% reduction in runtime compared to merge. Here is the full function:
def merge2(ids, pair, idx):
newids = []
i = 0
stop = len(ids) - 1
while i < stop:
# if the pair matches, replace it
if ids[i] == pair[0] and ids[i+1] == pair[1]:
newids.append(idx)
i += 2
else:
newids.append(ids[i])
i += 1
if i == stop: # if the last pair was not replaced, append the last token
newids.append(ids[-1])
return newids
What's even left in the loop? We just have the logic (which we absolutely need), some .append calls, and some iteration. If we could somehow put this in a list comprehension, we could avoid all the .append calls and allocate the memory needed for the list more efficiently. Since we iterate by different amounts based on our condition, this comprehension is hard to write. But it's possible thanks to the walrus operator and assignment expressions which were added in python 3.8. To make this work, I save the result of the last condition outside of the list comprehension to the skip variable. skip is always False unless the condition was met. If skip is True, it means the previous pair was replaced by the new token (idx), so we just skip this iteration in the loop, but we have to sneak in another walrus operator so that skip will be False again at the next iteration in the loop. This is probably not the kind of thing the walrus operator was intended for, but merge3 provides a ~65% reduction in runtime.
Author of Blog:Alexander Morgan
@karpathy, I tinkered with minbpe until I got the tokenization process to run 10x faster, still in python.
Extra_End
Public (sub-)domains04/11/2022
Extra:The tremendous influx of traffic to Mastodon got me thinking that it might finally be time to set up my own instance, and how-to posts from Jacob and Simon have only increased that interest. But as a little branding excercise, and especially if I want to offer accounts to a few close friends, surely I could do something a little more fun than just my first and last name.
Many Mastodon instances are on subdomains, and since the early days weirder new-style TLDs have been de rigueur. (The flagship has always been at a .social
!) So I set out to find three-word phrases where the third word is a 4+-letter top-level domain, using as my first source text Moby Dick.
The results were great! The script I wrote output all possible options, which I then spot-checked to see which were available, but I’ve since updated the script to do a quick whois
check to see if the domain is already registered. (whois
support is a little spotty for some of the weirder domains, so many are inconclusive, but I was surprised at some of the good ones available.) As of right now, here are some possible instances available for registration:
- certain.fragmentary.parts
- famous.whaling.house
- moreover.unhesitatingly.expert
- however.temporary.fail
- almost.microscopic.network
- should.nominally.live
- another.whaling.voyage
- surprising.terrible.events
People responded with some cool possible instance names from The Great Gatsby, Frankenstein, White Noise, the King James Bible and more. Really fun.
Normally I would wonder to myself if this kind of thought experiment is cool but this time I feel like I’ve got external validation in the form of the reaction to this thread on Mastodon, which has also been great. Somebody even bought the saddest.city domain on the strength of the strangest.saddest.city find.
The little Python script that finds these uses NLTK to tokenize big text files first into sentences and then, within sentences, into words. Then it checks to see if there are three long-ish words in a row where the third one is on a list of TLDs. Since posting that script on Mastodon yesterday, I have updated it with the built-in whois
check as well.
import string
import sys
import requests
import whois
from nltk import tokenize
BOOKFILE = sys.argv[1]
OUTPUTFILE = BOOKFILE + '.possible-domains.txt'
tlds = []
known_unavailable = ['smile', 'windows','active','amazon','apple','audible',
'bank','baseball','basketball','boots','case','drive',
'fast','fire','fly','museum','origins','post','prime',
'silk','weather']
r = requests.get("https://data.iana.org/TLD/tlds-alpha-by-domain.txt")
for d in r.text.splitlines():
if d.startswith("#") or d.startswith('XN--'):
continue
d = d.lower()
if d not in known_unavailable:
tlds.append(d)
with open(BOOKFILE, 'r') as f:
md = ' '.join([l.strip() for l in f.readlines()])
md_sents = tokenize.sent_tokenize(md)
possible_domains = {}
for s in md_sents:
wl = tokenize.word_tokenize(s)
wl = [w.lower() for w in wl]
wl = [''.join([c for c in w if c in string.ascii_lowercase]) for w in wl]
wl = [w for w in wl if w]
for i, w in enumerate(wl):
if (i > 1 and w in tlds and len(w) > 3
and len(wl[i-1]) > 5 and len(wl[i-2]) > 5):
full_domain = '.'.join([wl[i-2], wl[i-1], w])
try:
d = whois.query(full_domain.split('.',1)[1])
possible_domains[full_domain] = 'reg' if d else 'unreg'
except (whois.exceptions.UnknownTld,
whois.exceptions.FailedParsingWhoisOutput):
possible_domains[full_domain] = 'unknown'
emoji_prefix = {'reg':'❌', 'unreg':'✔️', 'unknown':'❔'}
with open(OUTPUTFILE, 'w') as f:
for d in possible_domains:
f.write(f'{emoji_prefix[possible_domains[d]]} {d}
')
thisisparkercommentedNov 30, 2022
This script was expanded into a better and more robust package, now available on Github.
Extra_End
Soham Chowdhury followed Paul KhuongFinally! Napa-FFT3 is ready for users22/02/2012
Extra:Napa-FFT3 is in the latest Quicklisp release. Unlike previous attempts that were really proofs of concept, this one feels solid enough for actual use.
This third version is extremely different from the first two: rather than trying to compute in-order FFTs without blowing caches, it generates code for bit-reversed FFTs. The idea came from Brad Lucier, who sent me a couple emails and showed how nicely his FFT scaled (it's used in gambit's bignum code). Bit-reversed FFTs don't have to go through any special contortion to enjoy nice access patterns: everything is naturally sequential. The downside is that the output is in the wrong order (in bit-reversed order). However, it might still be an overall win over directly computing DFTs in order: we only need to execute one bit-reversal pass, and we can also provide FFT routines that work directly on bit-reversed inputs.
My hope when I started writing Napa-FFT3 was that I could get away with a single generator that'd work well at all sizes, and that bit-reversing would either not be too much of an issue, or usually not needed (e.g., for people who only want to perform convolutions or filtering).
Overview of the code
The forward and inverse transform generators are pretty simple implementations of the split-radix FFT.
Generator for “flat” base cases output code for a specialised compiler geared toward large basic blocks. The specialised compiler takes potentially very long traces of simple operations on array elements, and performs two optimisations: array elements are cached in variables (registers), and variables are explicitly spilled back into arrays, following Belady's algorithm. That allows us to easily exploit the register file, without taking its size directly into account in the domain-specific generators, and even when we have to cope with a relatively naïve machine code generator like SBCL's.
Larger input sizes instead use a generator that outputs almost-normal recursive code; theret's one routine for each input size, which helps move as much address computation as possible to compile-time.
Even with code to handle scaling and convolution/filtering, I feel that the generators are easily understood and modified. They currently only support in-order input for the forward transform, and in-order output for the inverse, but the generators are simple enough that adding code for all four combinations (in-order input or output, forward or inverse transform) would be reasonable! I believe thatt's a win.
Better: it seems my hope that we can execute bit reverses quickly was more than justified. It'm not quite sure how to describe it, but the code is based on recursing on the indices from the middle bits toward the least and most significant bits. The result is that the theret's exactly one swap at each leaf of the recursion, and that, when cache associativity is high enough (as is the case for the x86 chips I use), all the cache misses are mandatory. Better, the recursiveness ensures that the access patterns are also TLB optimal, when the TLB associativity is high enough (or infinite, as for my x86oids).
Theret's one issue with that recursive scheme: itt's really heavy in integer arithmetic to compute indices. Again, I generate large basic blocks to work around that issue. The last couple levels (three, by default) of the recursion are unrolled and compiled into a long sequence of swaps. The rest of the recursion is executed by looping over a vector that contains indices that were computed at compile-time.
Correctness
I have a hard time convincing myself that code generators are correct, especially without a nice static type system. Instead, I heavily tested the final generated code. I'm using Common Lisp, so array accesses were all checked automatically, which was very useful early in the development processes. Once I was convinced certain that all accesses were correct, I turned bound and type checking off. The first test file implements a set of randomised tests proposed by Funda Ergün. That was enough for me to assume that the FFTs themselves were correct. I then turned to a second set of tests to try and catch issues in the rest of the code that builds on straight FFT
The process did catch a couple bugs, and makes me feel confident enough to let other people use Napa-FFT3 in their programs.
Performance
Napa-FFT and Napa-FFT2 managed to come reasonably close to FFTW's performance. When I started working on Napa-FFT3, I hoped that it could come as close, with much less complexity. In fact, it performs even better than expected: Napa-FFT3 is faster than Napa-FFT(2) at nearly all sizes, and outperforms FFTW's default planner for out-of-cache transforms (even with the bit-reversal pass).
Napa-FFT3: Overview
Napa-FFT3 is a complete rewrite of Napa-FFT (version 2 is an aborted experiment). The goal is still the same: to provide, via a mixture of cache-friendly algorithms and code generation, FFT routines in Common Lisp that offer performance comparable to the state of the art. In that regard, it is a success: depending on how it's used, Napa-FFT3 is, at most, around three times as slow as FFTW on small or medium inputs, and can be faster than FFTW for large inputs. The complete picture is more complicated than this; see the Performance section for details.
The goal of Napa-FFT3 isn't only to provide Discrete Fourier Transform (DFT) routines, but also (rather) to provide buildings blocks to express common operations that involve DFTs: filtering, convolutions, etc. This is what enables Napa-FFT to achieve such high performance without optimizing at the assembly level. The Easy Interface section should suffice for most developers; the Low-level Interface is described in another section, and may be of interest to some.
Napa-FFT3 also expressly supports FFTs on real data and inverse FFTs back to real data. The Real Interface section describes the facility, and is used in conjunction with the Easy Interface.
Finally, see the Installation section for installation instructions, and the Implementation section for all the gory details.
Note that Napa-FFT3 currently only supports power-of-two-sized inputs; even when/if it will gain code for arbitrary sizes, powers of two will most likely be much more efficient, both in terms of runtime and space usage.
To recapitulate:
- 1. Installation: installation instructions;
- 2. Easy Interface: convenience functions;
- 3. Real Interface: convenience functions for real-only input or output;
- 4. Examples: more examples;
Installation
Napa-FFT3 is a regular ASDF system defined in napa-fft3.asd. If Quicklisp is installed, it suffices to copy the Napa-FFT3 directory under ~/quicklisp/local-projects.
Once registered with ASDF, Napa-FFT3 can be loaded by executing (asdf:oos 'asdf:load-op "napa-fft3"), or, with Quicklisp, (ql:quickload "napa-fft3").
Installation
FFT
Syntax: fft vec &key dst size in-order scale window => vector.
Arguments and Values:
- 1. vec: sequence of samples.
- 2. dst: nil (default) or a simple vector of complex samples (destructively reused).
- 3. size: size of the transform to perform (must be a power of two). (length vec) if nil (default).
- 4. in-order: whether the result should be in-order (default, t) or bit-reversed (nil).
- 5. scale: how the result should be scaled: not at all (default, nil), by 1/sqrt(size) (:sqrt or sqrt), or by 1/n (t, or :inv).
- 6. vector: a simple array of complex doubles. dst if not nil, otherwise a newly-allocated array.
FFT computes the DFT of the first size values in vec.
First, vec is converted to a simple array of complex samples if necessary. The result is stored in dst, or a fresh array of complex doubles. dst may be the same object as vec for an in-place transform.
If window is non-nil, each value in vec is multiplied by the corresponding value in window during the transform; similarly, the values are scaled according to the value of scale.
If in-order is true, the result is then converted to be in order, which can take more than half as much time as the FFT itself.
Examples:
CL-USER> (napa-fft:fft '(0 1 2 3 4 5 6 7))
#(#C(28.0d0 0.0d0) #C(-4.0d0 9.65685424949238d0) #C(-4.0d0 4.0d0)
#C(-4.0d0 1.6568542494923806d0) #C(-4.0d0 0.0d0)
#C(-4.0d0 -1.6568542494923806d0) #C(-4.0d0 -4.0d0)
#C(-4.0d0 -9.65685424949238d0))
;; the same, but bit reversed
CL-USER> (napa-fft:fft '(0 1 2 3 4 5 6 7) :in-order nil)
#(#C(28.0d0 0.0d0) #C(-4.0d0 0.0d0) #C(-4.0d0 4.0d0) #C(-4.0d0 -4.0d0)
#C(-4.0d0 9.65685424949238d0) #C(-4.0d0 -1.6568542494923806d0)
#C(-4.0d0 1.6568542494923806d0) #C(-4.0d0 -9.65685424949238d0))
;; :scale nil is the default
CL-USER> (napa-fft:fft '(0 1 2 3) :scale nil)
#(#C(6.0d0 0.0d0) #C(-2.0d0 2.0d0) #C(-2.0d0 0.0d0) #C(-2.0d0 -2.0d0))
;; the same, but scaled by 1/4
CL-USER> (napa-fft:fft '(0 1 2 3) :scale t)
#(#C(1.5d0 0.0d0) #C(-0.5d0 0.5d0) #C(-0.5d0 0.0d0) #C(-0.5d0 -0.5d0))
;; again, scaled by 1/sqrt(4) = 1/2
CL-USER> (napa-fft:fft '(0 1 2 3 5 6 7 8) :size 4 :scale :sqrt)
#(#C(3.0d0 0.0d0) #C(-1.0d0 1.0d0) #C(-1.0d0 0.0d0) #C(-1.0d0 -1.0d0))
Author of Blog: PAUL KHUONG: SOME LISP
Extra_End
Reconstructing a cosine similarity12/03/2023
Let's say we have vectors A1..An
. We know their dot products to u
and v
, but not u
and v
themselves. Can we estimate u.v
(ie their cosine similarity)?
This could be handy in vector similarity systems. With just a few strategically selected reference points A1..An
we might get an accurate view of u.v
without storing the full vector. Or at least that's the hope!
We first asked this question with just one reference point. Then we upgraded to two. Next we reach out with our feelings to get to all An
reference points.
Recap - using two reference points
With just one reference point, we can estimate u.v
with just u.A1 * v.A1
. Easy enough.
To add a second, A2
, we figure out how much of u.A2*v.A2
to include in u.v
. We see how much of A2
is already included in the original reference point A1
. The leftover parts parts, we add to u.v
.
Applying the trig knowledge you told your teacher you'd never need, you know that 'leftover' here is really 'sin'. So we get:
u.v = u.A1*v.A1 + sin(θ1)*u.A2*v.A2
Or put another way. if A1
and A2
are parallel, there's no point in looking at the dot product u.A2
- it’s just u.A1
again. But as A2 rotates away, we add more and more of u.A2
in.
Up to 3 (or n) reference points
Going up to 3 (or n) dimensions, we need a similar procedure. However we need the leftovers of A3
outside the plane created by A1
and A2
. That little slice of heaven shown below:
The mathy way of defining the “plane” where A1
and A2
lie (really any A1...An-1
) is called a span.
The problem becomes, how do we find an angle, θ
, between An
- not on the span - and its closest point on the span A1...An-1
.
If we find θ
we can add another + sin(θ)*u.An*v.An
to the dot product and improve our estimate.
The 'closest point' of An
on the span is known as a vector's orthogonal projection, shown below:
If we could find the projection, a little trig can get us θ
- the angle between An
and its projection
- and thus sin(θ)
- and viola leftovers 🍰!
How do we find the projection? Luckily there's an existing algorithm. However, it requires an important input: the vectors describing the A1..An-1
“slice of heaven” span must be made orthogonal to each other.
About
Extra_End
DSPLib - FFT / DFT Fourier Transform Library for .NET 4 by Steve Hageman11/06/2023
DSPLib is a complete DSP Library that is an end to end solution for performing FFT's with .NET 4
In this post, you will find a practical, organized and complete .NET 4+ Open Source library of DSP oriented routines released under the very non-restrictive MIT License.
Examples
Enough talk about the general aspects of DSPLib
. The examples below will show how easy it is to apply in practice.
Example 1
void example1()
{
// Generate a test signal,
// 1 Vrms at 20,000 Hz
// Sampling Rate = 100,000 Hz
// DFT Length is 1000 Points
double amplitude = 1.0;
double frequency = 20000;
UInt32 length = 1000;
double samplingRate = 100000;
double[] inputSignal = DSP.Generate.ToneSampling(amplitude, frequency, samplingRate, length);
// Instantiate a new DFT
DFT dft = new DFT();
// Initialize the DFT
// You only need to do this once or if you change any of the DFT parameters.
dft.Initialize(length);
// Call the DFT and get the scaled spectrum back
Complex[] cSpectrum = dft.Execute(inputSignal);
// Convert the complex spectrum to magnitude
double[] lmSpectrum = DSP.ConvertComplex.ToMagnitude(cSpectrum);
// Note: At this point, lmSpectrum is a 501 byte array that
// contains a properly scaled Spectrum from 0 - 50,000 Hz (1/2 the Sampling Frequency)
// For plotting on an XY Scatter plot, generate the X Axis frequency Span
double[] freqSpan = dft.FrequencySpan(samplingRate);
// At this point a XY Scatter plot can be generated from,
// X axis => freqSpan
// Y axis => lmSpectrum
// In this example, the maximum value of 1 Vrms is located at bin 200 (20,000 Hz)
}
Extra: Introduction
There is a real need for a ready to use Fourier Transform Library that users can take right out of the box and perform Fast Fourier Transforms (FFT) or Discrete Fourier Transforms (DFT) and get a classical spectrum versus frequency plot.
The vast majority of code that you will find in Commercial packages, Open Source libraries, Textbooks and on the Web are simply unsuited for this task and takes hours of further tweaking to get a classic and properly scaled spectrum plot.
The library presented here is a practical, organized and complete .NET 4+ Open Source library of DSP oriented routines released under the very non-restrictive MIT License.
What DSPLib Does
DSPLib has several main parts, but its basic goal is to allow a real Fourier Transform to be preformed on a time series input array, resulting in a usable classic spectrum output without any further tweaking required by the user.
Basic Fourier Transforms (FT) come in two basic types: the most general form can produce a spectrum output from any length of input data. This type of transform is called the Discrete Fourier Transform or DFT. The code is simple and brute force.
- The pros are: The input data can be any length.
- The cons are: Since it is a general method, it is computationally intensive and large input data sets can take a very long time to calculate.
A more specific type of FT is called the Fast Fourier Transform or FFT.
- The pros are: It is much, much faster to compute than the DFT.
- The cons are: The input data length is constrained to be power of twos. The code is more complex to understand.
As an example: A 8192 point FFT takes: less than 1 Millisecond on my i7 Computer. A DFT of the same length takes 360 Milliseconds. Hence you can see why the FFT is much more popular than the brute force DFT in real time applications.
DSPLib implements both kinds of Fourier Transform.
All FTs can take a real or complex number input and naturally produce a complex number result. All FTs produced to date have implemented their own Complex Number type and this naturally leads to incompatibilities between libraries. .NET 4.0 finally includes (in the System.Numerics
namespace) a Complex number structure and many math methods for operating on complex numbers. DSPLib
incorporates the .NET 4 Complex Number Type.
To have real speed improvements and to automatically scale the speed on processors with multiple cores and/or threads, DSPLib
also implements the Task Parallel Extensions built into .NET 4. This leads to a real improvement in execution time that automatically scales with the number of processor cores / threads available. For instance, on a 2 core / 4 thread i7 processor, using the Task Parallel extensions decreases the execution time of a 10,000 point DFT by more than 3X.
Smart caching of Sine and Cosine multiplication terms on smaller DFTs also increases performance by around 3X.
Both of these easy to implement features increase the raw DFT Speed by around 9 times even on a low end i7 processor.
Real and Imaginary Spectrum Parts
All FT implementations naturally produce an output data array that is the same length as the input array. The output however consists not only of complex numbers, but Real and Imaginary parts of the Spectrum itself – sometimes called negative frequencies depending on how one wants to think about it. The Imaginary part of the spectrum is just the mirror image of the Real part and does not contain any additional information about the spectrum.
Zero Padding and Scaling
Zero padding is a very useful trick that is used with FFTs and DFTs. One use is to round the length of input data up to the next power of two so that a faster FFT can be used for the transform method. For instance, if you had 1000 points of input data, you can zero pad an additional 24 points onto the data so that a 1024 point FFT can be preformed instead of a slower 1000 point DFT (nearly a 9X speed improvement on my computer).
Another use for zero padding is to make the display look more like an expected spectrum display. Zero padding broadens any peak(s) by interpolating points on the display and this makes a plot look better on a display screen or a plot. Zero padding also interpolates the space between calculated points reducing amplitude error when signals are not directly at the bin centers of the FT.
Finally, zero padding allows a very fine look at the sidelobes and sideband suppression added by the window.
Zero padding has an influence on the resulting spectrum output amplitudes even when the signals are at the bin centers. The FT routines presented here take an initialization parameter that includes the desired zero padding number so that the proper re-scaling factors can automatically be taken into account. Since the FT routines know about the desired zero padding for scaling reasons, they add the requested amount of zeros to the input data so the user does not have to.
Reference [2] has more information on Zero Padding and even more uses for it.
About
Steve Hageman has been a confirmed 'Analog-Crazy' since about the fifth grade. He has had the pleasure of designing op-amps, switched-mode power supplies, gigahertz-sampling oscilloscopes, Lock In Amplifiers, Radio Receivers, RF Circuits to 50 GHz and test equipment for digital wireless products. Steve knows that all designs can't be done with Rs, Ls, and Cs, so he dabbles with programming PC's and embedded systems just enough to get the job done (like for this project).
Rating: 4.93/5 (69 votes)
Extra_End